Quantity Formula
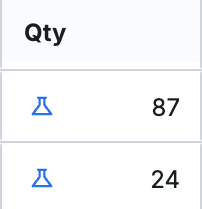
Quantity Formulas are used to calculate values in your estimate. These formulas can draw from a variety of sources, including variables found in other parts of your estimate such as line items, Rooms, Units, sort codes, etc. When viewing your estimate under the Quantity column, any “potion” icons you see represent a quantity formula. Create your own by using the steps below.
In this article
- Add a Quantity Formula
- Edit a Quantity Formula
- Delete a Quantity Formula
- Add a Note to Quantity Formula
- Using Values within Quantity Formulas
- Value Color Cheat Sheet
- Value Cheat Sheet
- Operator Cheat Sheet
- Quick Keys
Add a Quantity Formula
To add a quantity formula, you can right-click on the line item you want to add a formula to, and select the Edit Quantity Formula option.

A pop-up window will appear, allowing you to create a formula for this line item with any Values (like Area, Metric, Number, etc.) and Operators (Add, Subtract, Divide, etc.) you’d like.

Note: Please be aware that VM Decision values may be designed to be excluded in formulas if they are unaccepted. Please review our article, How Value Management Decisions are Filtered in Formulas, for more information.
Edit a Quantity Formula
You can edit the quantity formula of a line item by clicking on the blue “potion” icon. A pop-up window will appear displaying the automatic formula created in the platform based on the line item.
To edit the formula, or add elements to it, you can click on the blue + button located on the top right, or by using your keyboard and pressing Ctrl + Enter. You can also remove these elements by clicking on the X next to the box in question, or by pressing Delete on your keyboard.

If you’ve made any changes that you’d like to save, be sure to click on the Save button; otherwise, if you click Close or close the screen, none of the changes will be saved.
Delete a Quantity Formula
If you want to delete a quantity formula, you can right-click on the cell where the formula is located (or the line item where this formula is located), and select the Clear Quantity Formula option.

Note: If you want to fully zero out the quantity of a line item, highlight the quantity cell of that line item, enter "0” on your keyboard, then press Enter.
To manually override your Quantity Formula with a number other than zero, highlight the quantity cell of the line item, enter the number, then press Enter.
Both actions will gray out your potion icon, but will not affect your formula. Clearing out the override number you entered (highlight the cell, press Delete on your keyboard, then press Enter) will return the cell to the Quantity Formula value.

Pro Tip: If you ever have line items in your estimate with invalid quantity formulas (the potion icon will be red instead of blue), you can always go to your Line Items view, click on the stethoscope next to the Estimate name, and then under Errors you should see a message notifying you of any line items with invalid (or broken) formulas:

Clicking that message will filter your view to display those line items with broken formulas, so you can then review and correct them as needed. Another way to also view this within the Line items view of your estimate is to filter using the Formula Status filter and selecting the Broken option:

Add a Note to Quantity Formula
Add a note to your quantity formula for more context when viewing line items in your estimate.
- Open the quantity formula modal.
- Click the blue Add Note button in the top-right corner of the modal.
- Enter your note into the text box, and click Save Note.
- Edit your note by going back into the quantity formula and clicking the Edit Note button in the top-right corner of the modal.

When working in your estimate, hover over the quantity cell to view the note.

Using Values within Quantity Formulas
Metric
The Metric value within Quantity Formulas is a way to “show your work” within your formula. Using the Metric value allows users to indicate the Unit of Measurement and have these values and UoM’s displayed within the estimate itself for easy viewing and editing.
For example, you could calculate Length x Width x Height within your Quantity Formula.

Ediphi exposes the first 3 metrics in a formula when you click the arrow on the QTY column. Edit these metrics right within your Detailed Summary for adjustments on the fly as your design process might change.

Number
These are different from Metric values in that they are used to calculate by a single number only. Use Number values when you would like to simply add/subtract/divide/multiply by a single number with no Unit of Measurement tied to it. Keep in mind that utilizing a number does not expose it inside the estimate or will show a UoM like Metric values do.

Area
The Area value is a way to tie your Area Sheet into your Quantity Formula. Users are able to select whichever floors they’d like from their Area Sheet, organized by Unassigned Floors or Building. Additionally, users can select from different columns they’d like to specify from their Area Sheet, or Total Area or Floor Count.

Note: The options listed in the From/To dropdown menus display Unassigned Floors unless specified by the Building Label ahead of the option.
Example: Lowest Floor vs. B1 - Lowest Floor (B1=Building Label)

Line Item
Ediphi offers the ability to link line item quantities to the quantities of other line items. In essence, the quantity of one line item can be incorporated into the dynamic formula of another line item, leading to automatic updates for any dependent line items. This streamlines the process, offering increased efficiency and less manual input. For more information, see Line Item Dependency.

Geometry
The Geometry value pulls a measurement from a Geometry Worksheet. Choose a worksheet, then a calculation (a single row, or All to total every row), then a column such as Length, Quantity, or Volume. If your line item is inside an assembly, you can also choose This Assembly.
Note: Changing the worksheet clears the Calculation and Column fields. If the selected row is deleted, the value shows Geometry worksheet not found.
Units
Ediphi offers the ability to create Quantity Formulas which reference Units that automatically update based on your project's Unit Mix. Because these formulas are linked to your Unit Mix, any changes to unit counts will automatically update the quantities of any associated line items.
Keep in mind that your line item must be assigned to exactly one Use Group before you can reference units in a Quantity Formula. If it's assigned to none or more than one, the formula window shows a message saying the line item must be assigned to a single use group, and the formula can't be saved. The Units value automatically uses the totals for your line item's Use Group, so you don't need to pick a unit.

Rooms
Ediphi offers the ability to include Rooms data in Quantity Formulas, which can be useful for allowances based on square footage without cluttering your room detail view. Because these formulas are linked to Rooms, any updates to room counts or dimensions will automatically update the associated quantities.
Keep in mind that your line item must be assigned to a Use Group before you can reference Rooms in a Quantity Formula. The list of available rooms will be based on the Use Group selected, meaning you can only select rooms from the same Use Group as your line item.

Area Total vs. Area Average: Area Total returns the combined square footage across all instances of a room (Average Area × Room Count), while Area Average returns the square footage of a single instance. Area Total is recommended for square footage-based allowances.
Active Floor
The Active Floor value adds up floor data across every floor marked active for a Use Group. For example, Floor Count returns the number of active floors, and Floor Area returns that Use Group's total area on those floors. If your line item has only one Use Group, it's selected for you.
Note: Active Floor doesn't use the line item's own floor. It uses all active floors for the Use Group you select. The value stays at 0 until both the Use Group and Column are selected.
Vertical Transportation
Ediphi offers the ability to include stair, elevator, or escalator data defined in your Area Sheet by using the Vertical Transportation value within Quantity Formulas.
For example, to calculate risers for an egress stair, divide the total floor-to-floor height by your rise/run ratio (e.g., 7÷12). Set the Rounding dropdown to Whole to ensure whole numbers, since partial steps aren't practical.

Keep in mind that vertical transportation elements (stairs, elevators, escalators) must be added to your Area Sheet before they can be referenced in a Quantity Formula.
Note: The All Stairs, All Elevators, and All Escalators options combine every one of that type, so a floor with two stairs counts twice. If a stair, elevator, or escalator is deleted, the value shows Transportation not found.
Category
In an estimate, the Category column lets you group line items by a shared label. This group of line items' total quantity can be referenced within Quantity Formulas. This is particularly useful for line items that are driven by the sum of others, such as temporary floor protection or fixture counts.
Before creating your Quantity Formula, go to the Detailed Summary and add a Category to line items by typing a category label directly under the Category column for each applicable line item.
Note: All line items within a Category must share the same Unit of Measurement (UoM). If units differ, the formula will sum the raw numbers regardless, producing inaccurate results.
Because these formulas are linked to the category total, any changes to individual line items will automatically update the associated quantities.
Sort Codes
Ediphi offers the ability to reference specific Sort Fields and Sort Codes in Quantity Formulas, and even columns within them for more specific referencing. This can be useful for basing a quantity on a specific trade or cost category rather than the entire estimate.
Pro Tip: A single Quantity Formula can reference multiple sort codes. To do this, simply add additional sort code references within the same formula to combine values.
Note: A Sort Codes value stays at 0 until the Sort Field, Sort Code, and Column are all selected. It never counts lump-sum items, GC/GR items, assembly children, or the line item you're editing. If the line item you're editing has the same sort code, the result is 0.
Because these formulas are dynamically linked, any changes to line items containing that Sort Field/Code/Column will automatically update the associated quantities.
Attributes
The Attributes value pulls the value of an attribute set up on your estimate. It works the same way in Quantity, Markups, and Units formulas.
Note: If the attribute is blank or isn't a number (such as text), the value returns 0.
Value Color Cheat Sheet
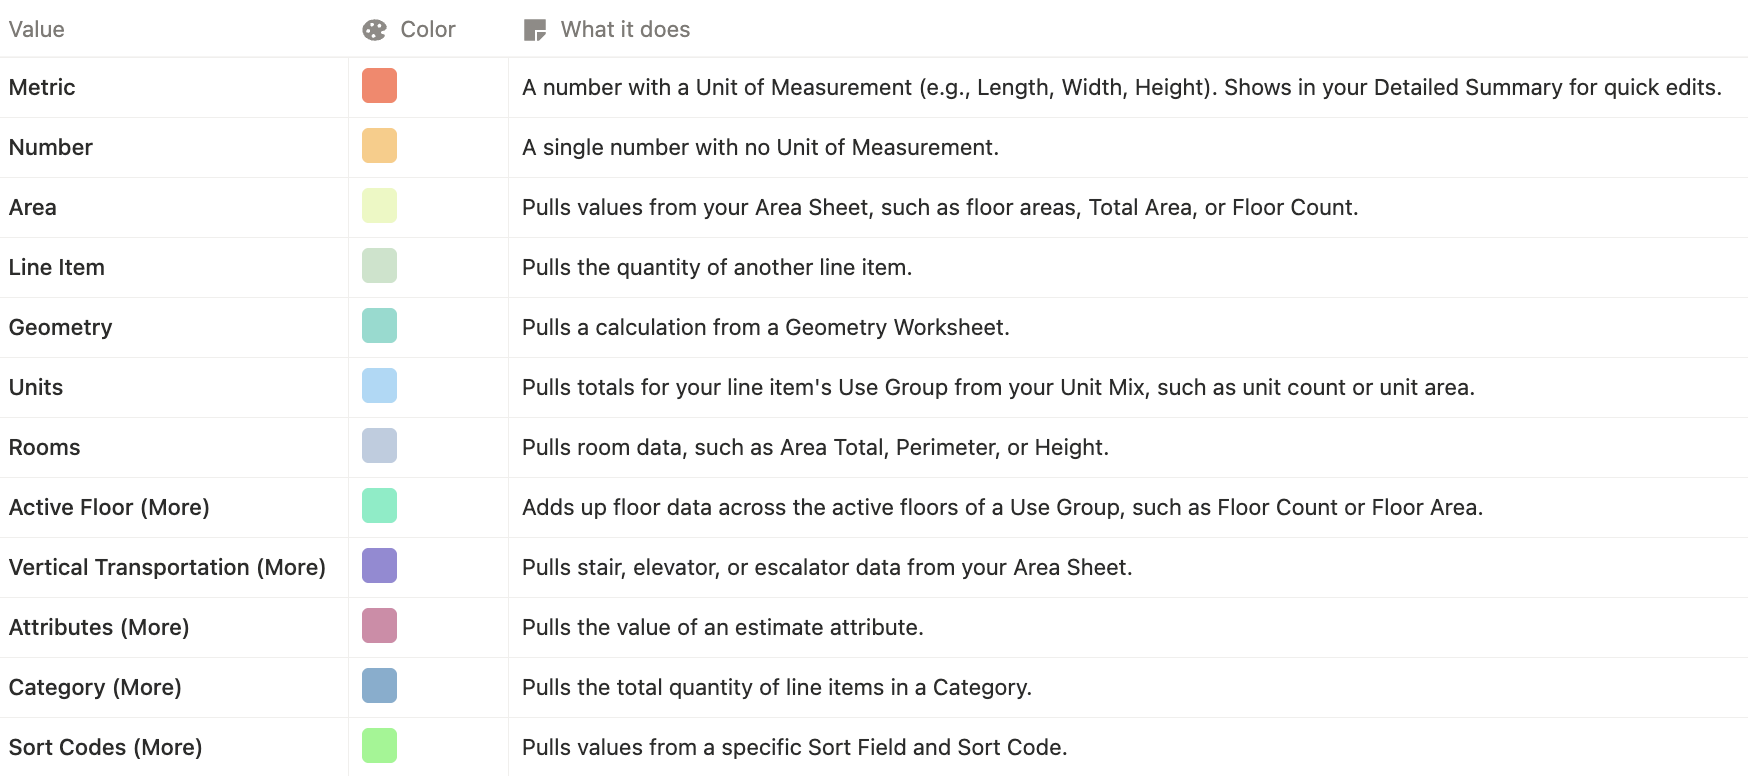
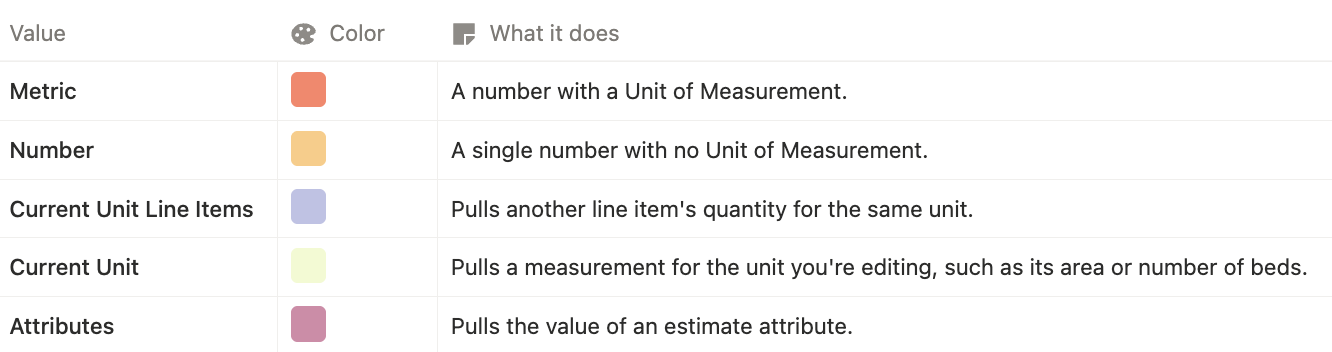
Each value you add to a formula (the colored blocks) has its own color, so you can tell at a glance what each part of a formula is pulling from. Every value has black text on its color. Operators appear as white blocks with a bold symbol, an empty block has a dashed border, and the block you have selected has a dark gray border.
Quantity Formulas
Click + to add an empty block. The Add Value panel shows the 7 main values. Click the gray More button to see the additional values, and click < Back to return to the main ones.
Markups Formulas
All values appear on one panel (there is no More button).
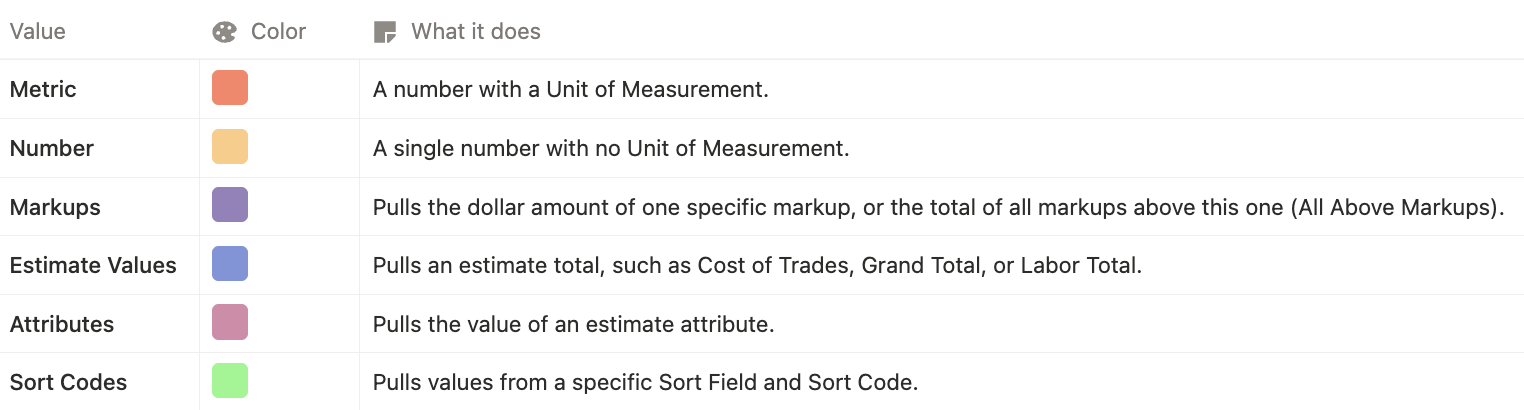
Note: If your project uses VM markups, some of these values have different labels (such as Base Bid, VM Standard, or VM Custom Markups/Values), but the colors stay the same. The Markups list only shows markups in the same section, and totals only count that section's line items.
Units Formulas
To open a Units formula, go to the Units tab, open Line Items, right-click a line item, and select Edit Quantity Formula. All values appear on one panel (there is no More button).
Value Cheat Sheet
Every value has an Add If/Else Condition button at the bottom of its settings. Rounding is set for the whole formula, not for each value: use the Rounding dropdown at the bottom of the formula window, next to the result (None, Whole, Tens, Hundreds, Thousands). Markups formulas don't have rounding.
Metric
- Value (Number only)
- UM (Unit of measurement)
Number
- Number (Number only)
Area
- From (Select a floor)
- To (Select a floor)
- Column (from Area)
Line Item
- Estimate Use Group (Select use group)
- Estimate Line Item (Select line item)
Geometry
- Geometry Worksheet (Select a geometry worksheet)
- Calculation (Select a calculation [All, or a single row])
- Column (Select a column [Width, Length, Height, Diameter, Quantity, Volume, Horizontal Surface Area, Vertical Surface Area])
Units
- Column (Select a column [Units, Unit Area, and any unit specs for the Use Group, such as Beds or Baths])
Rooms
- Room (Select room)
- Column (Select column [Perimeter, Height, etc.])
Active Floor
- Estimate Use Group (Select use group)
- Column (Select column [Floor Count, Floor Area, Floor to Floor, Floor Perimeter, Gross Facade])
Vertical Transportation
- Transportation (Select vertical transportation [All Stairs, All Elevators, All Escalators, or a specific stair, elevator, or escalator])
- Column (Select column [Floor Count, Floor to Floor, Floor Perimeter])
Attributes
- Estimate Attribute (Select an attribute)
Category
- Line Items Category (Select a Line Item category)
Sort Codes
- Sort Field (Select a Line Item Sort Field)
- Sort Code (Select a Line Item Sort Code from the chosen Sort Field)
- Column (Select a column [Quantity, Total Cost, Labor Total, Materials Total, Equipment Total, Subcontract Total, Other Total])
Current Unit (Units formulas only)
- Column (Select a column [Area, Beds, Terminal HVAC units, Baths, 1/2 Baths, Average Height]. Options vary if your Use Group has custom unit specs.)
Current Unit Line Items (Units formulas only)
- Line Item (Select another line item with unit quantities)
Estimate Values (Markups formulas only)
- Value (Select a value [Cost of Trades, Grand Total, Labor Total, Materials Total, Equipment Total, Subcontract Total, Other Total])
Markups (Markups formulas only)
- Value (Select a value [All Above Markups, or any other markup on the estimate])
Operator Cheat Sheet
+ (Add)
- Calculates the sum of two values
− (Subtract)
- Calculates the difference of two values
÷ (Divide)
- Divides one value by another
× (Multiply)
- Multiplies two values
^ (Exponentiation)
- Raises a number to the power of a specific number
() (Open Parenthesis and Closed Parenthesis)
- Specifies that the expressions within the open parenthesis and close parenthesis are evaluated first. All other expressions are evaluated using standard operator precedence.
Quick Keys
These work in all formula editors. On Mac, use Control (not Command).
- Ctrl + Enter or Enter: Add a new value (Enter works when you aren't typing in a field)
- Delete: Remove the selected block (Backspace does not remove blocks)
- Left / Right arrow: Select the previous or next block
- Ctrl + Left / Ctrl + Right: Jump to the first or last block
- Alt + Left / Alt + Right: Move the selected block
- + − / * ^ ( ): Set the operator and add the next block
- Ctrl + =, -, /, 8, 6, 9, or 0: Insert +, −, ÷, ×, ^, (, or ) (works even while typing in a field)
- Escape: Close the formula window without saving
- On an empty block, type a letter to choose the value type. Values under More... don't have letter keys.
| Key | Value |
|---|---|
| M | Metric |
| N (or any digit) | Number |
| A | Area |
| L | Line Item |
| G | Geometry |
| U | Units (Current Unit in Units formulas) |
| R | Rooms |
| Q | Current Unit Line Items (Units formulas only) |
If you have any questions, feel free to contact our support team, and we'll be happy to help!