Understanding Buildings
In Ediphi, Buildings help you organize your project by grouping different structures or sections. By setting up distinct Buildings, you can easily configure floors, vertical transportation, and units, creating a more streamlined way to manage your project.
Think of Buildings as an extension of the Area Sheet; a structured layer that makes it easier to navigate, track, and oversee project data. Once set up, Buildings can be used across the platform, including Area Sheets and Units, giving you a consistent way to view and manage information.
This feature has evolved from being just a floor filter in your Area Sheet to a powerful cost calculation tool. You can now:
- Assign specific Use Groups to Buildings.
- Group by Building within the Detailed Summary and Schedule of Values.

With these enhancements, you can better answer the question: “How much does this specific building in my project cost?”.
In this article
- How to Create Buildings
- How to Edit Building Labels
- How to Delete a Building
- How to Assign Use Groups to a Building
- Using Buildings
- Troubleshooting Building Errors in Area Sheet
- FAQs
How to Create Buildings
-
Start in your Estimate, and hover over the Buildings option located on the top menu.
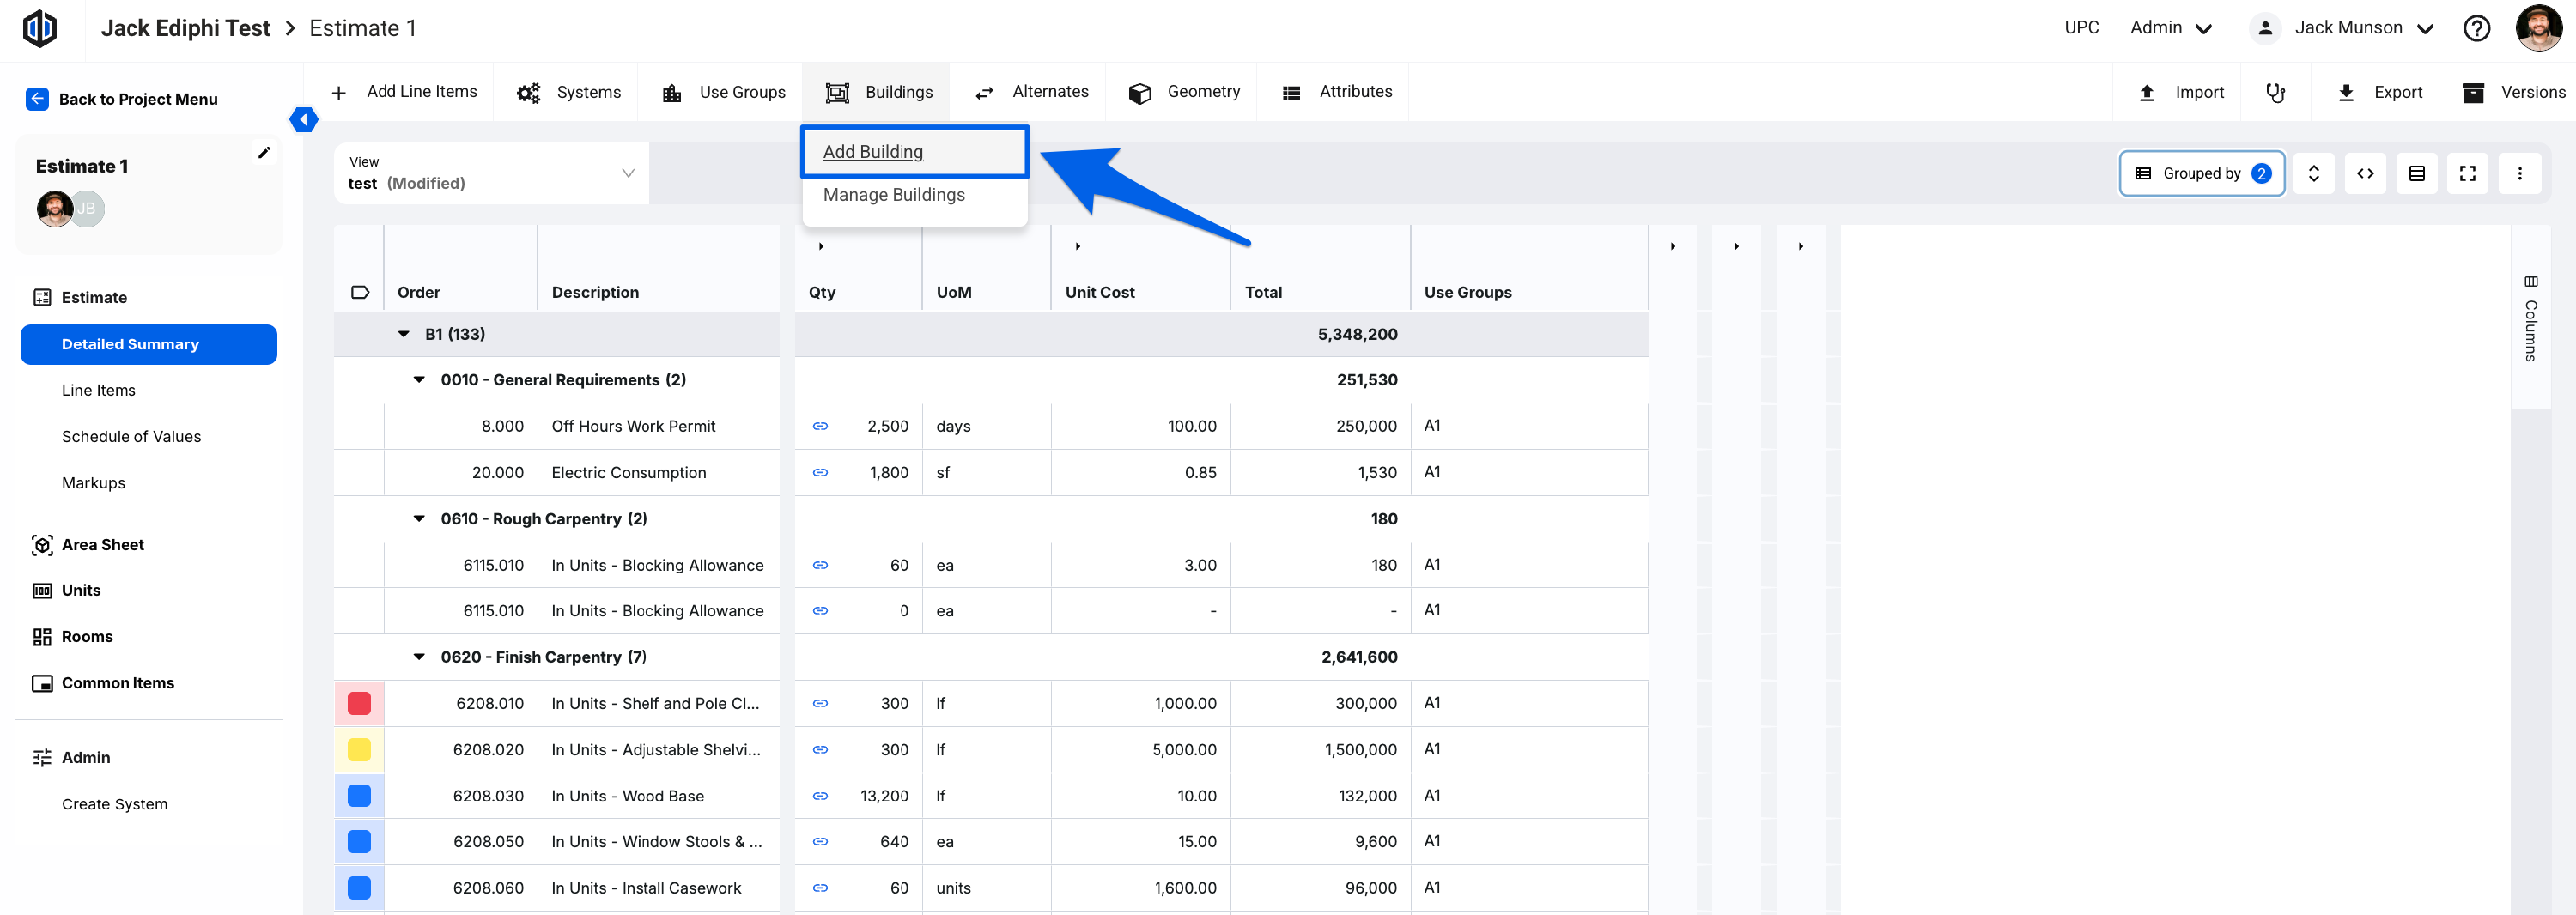
- Click Add Building.
- Give the Building a name under the Description field, and click Save.


How to Edit Building Labels
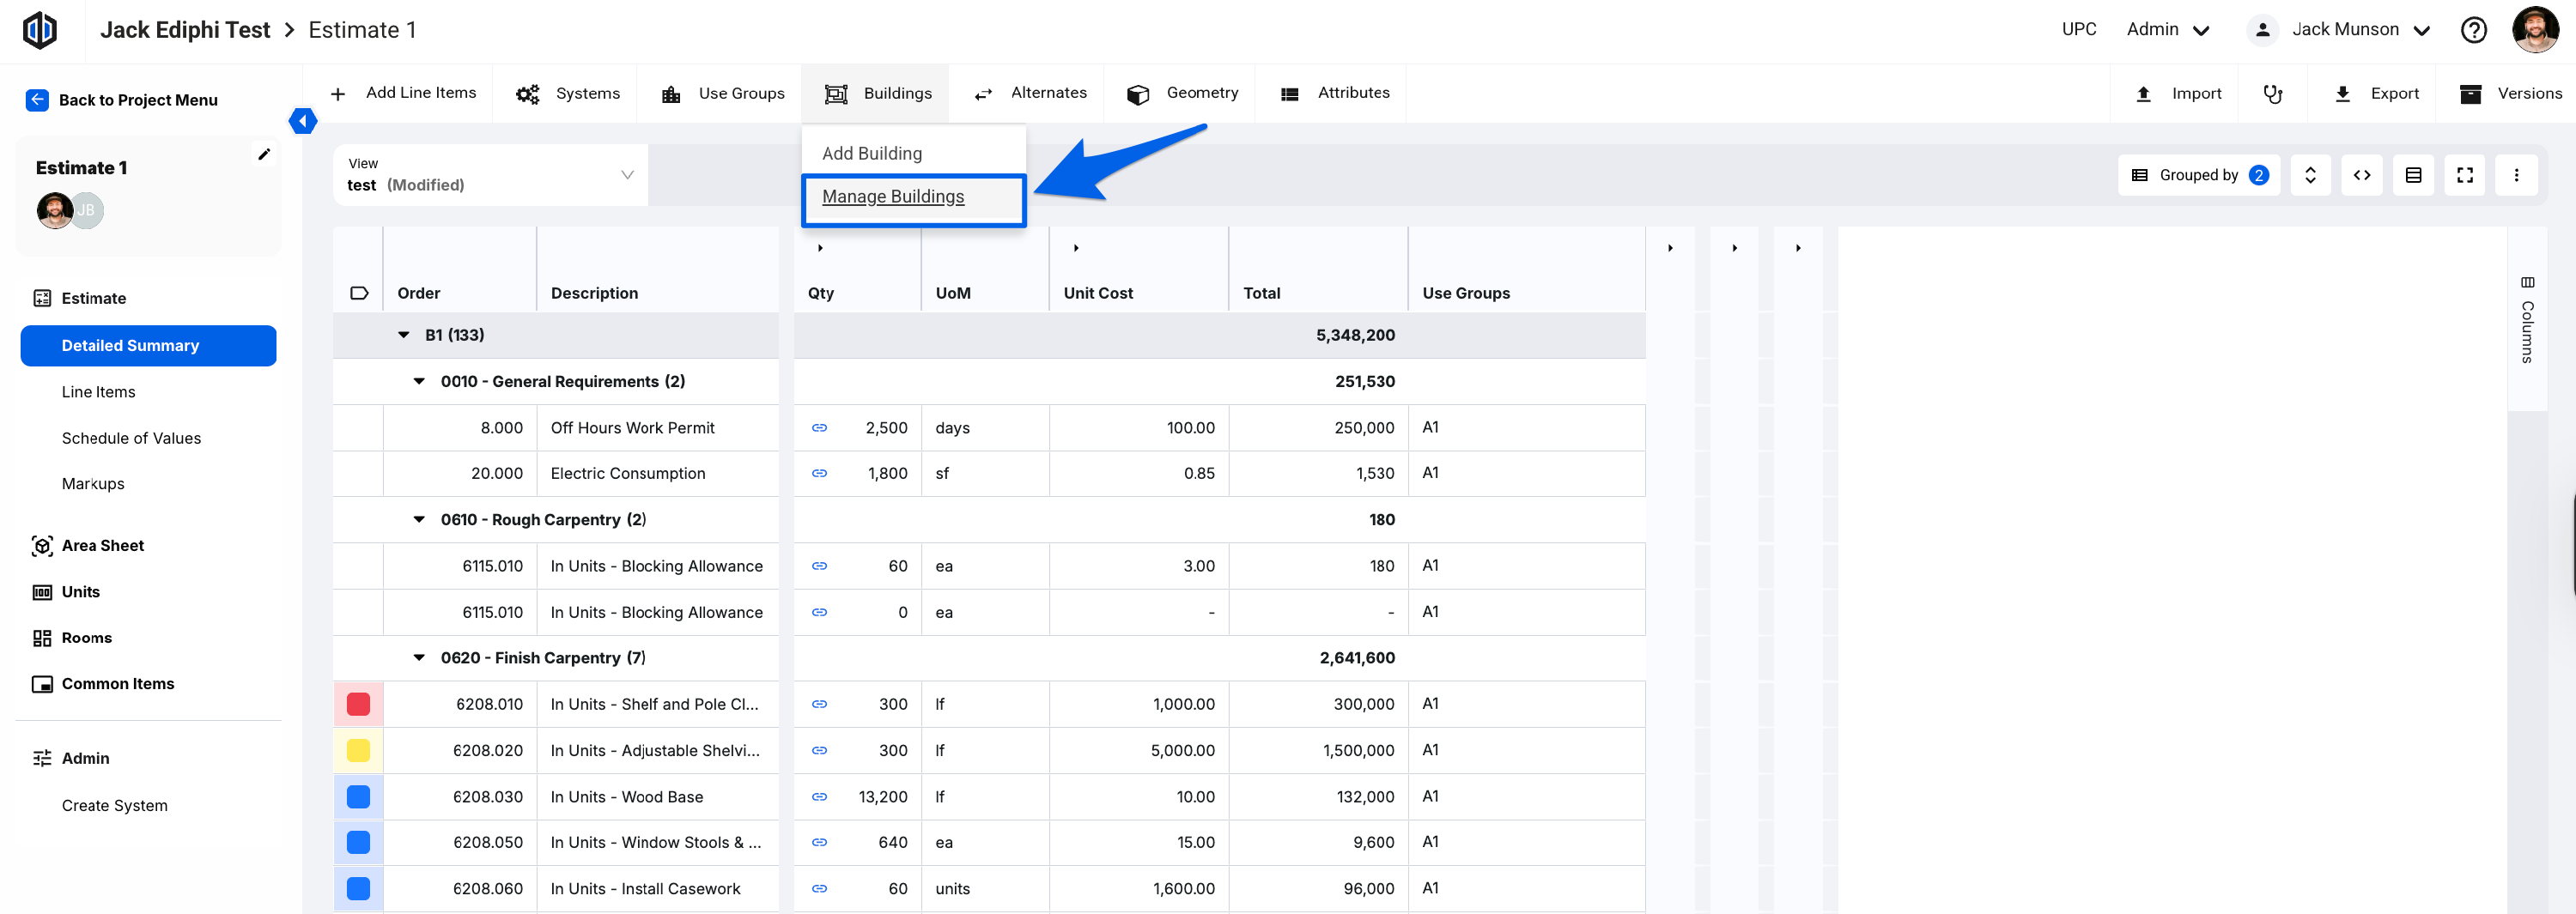
- Start in your Estimate, and hover over the Buildings option located on the top menu.
- Click Manage Buildings.
- Double-click inside the Label cell of your Building.
- Make the necessary edits, and click Save.

How to Delete a Building
- Start in your Estimate, and hover over the Buildings option located on the top menu.
- Click Manage Buildings.
- Select the trash can icon next to the Building you wish to delete.
- Click Confirm.

Note: When you delete a Building from your estimate, its floors and any area data assigned to Use Groups are not deleted. Instead, they are moved back to the Unassigned Floors section.
How to Assign Use Groups to a Building
Note: Make sure your Buildings are created in the estimate before performing these steps.
- Start in your Estimate, and hover over the Use Groups option located on the top menu.
- Click Manage Use Groups.
- Under the Building column, double-click and select the specific Building you want to assign the Use Group to.

- Click Done.
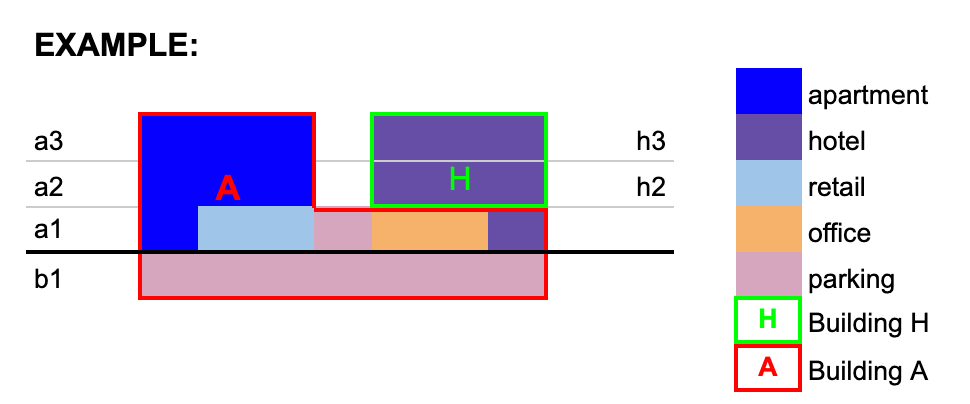
Pro Tip: Use Groups can only have one Building association, though a Building can have many Use Groups assigned to it. This is to prevent confusion about how costs are distributed between Buildings. If a Use Group needs to appear in multiple Buildings, separate ones must be created (e.g., an Apartment Use Group labeled “Apartment East”, and another Apartment Use Group labeled “Apartment West”, like the image example above.)
Using Buildings
Within the Area Sheet
Users can assign specific floors to Buildings through the Area Sheet, ensuring clear organization in projects with multiple structures. This prevents confusion when working with identical floors by keeping them grouped within the correct Building.
Use the Buildings drop-down to quickly switch between Buildings and configure the Area Sheet for each one.

Within Units
Because Units are based on Use Groups, Buildings are directly affected. Units must be assigned to each Building which is linked to a Use Group. For example, if an Estimate includes three Buildings, Units need to be assigned separately to each one within each Use Group.
Use the Buildings drop-down feature to quickly switch between Buildings and configure Units for each one.
Within the Detailed Summary
Now that you can assign specific Use Groups to Buildings, you can use the Buildings Grouping feature in the Detailed Summary to better visualize costs.
In the Grouping dropdown of the Detailed Summary, select Building. Your line items will then be sorted by the Building they belong to; based on the Use Groups assigned within each Building.
Within Use Group Allocations
Since specific Use Groups can now be assigned to Buildings, we’ve enhanced the Use Group Allocation modals to clearly reflect which Use Group belongs to which Building (if assigned). This way, you can ensure that you’re selecting the correct Use Group within your Buildings when spreading cost.

Troubleshooting Building Errors in Area Sheet
Depending on how your estimate was previously set up (specifically how Buildings and Use Groups were assigned in your Area Sheet), you may encounter one or more of the following:
- A warning message: “There are Use Groups with area on a Building that it is not assigned to.”

- A Use Group label displayed in red.

- A Use Group highlighted in red within the Manage Use Groups modal.

These issues are usually caused by either:
- Use Groups having area in a Building they’re not linked to (different from the Building assigned in the Manage Use Groups modal).
- Use Groups having area spread across multiple Buildings in the Area Sheet.
How to Resolve
To fix this, you can:
- Reassign Use Groups to the correct Buildings in your Area Sheet; see here.

- Create separate Use Groups for each Building (if you need the same Use Group reflected across different Buildings).

- Move the floor area of the Use Group to the correct Building it’s assigned to.

Pro Tip: Some Use Groups may not neatly belong to a specific Building (e.g., Site Development). In these cases, you have two options:
- Leave it unassigned and enter the area in the Unassigned Floors section. This will display under “No Building Assigned” when grouping by Buildings in the Detailed Summary.
- Create a dedicated Building for it. This makes it easy to distinguish from other Buildings when grouping in the Detailed Summary.
FAQs
- Why should I associate Use Groups with Buildings in my estimate?
Associating Use Groups with Buildings allows you to easily calculate costs per Building by grouping your estimate accordingly.
- I see an error in my Area Sheet; why?
Refer to the Troubleshooting Building Errors in Area Sheet section above.
- I assigned Use Groups to their Buildings, but the error is still there. Why?
If every Use Group is assigned to a Building but the error persists, it usually means a single Use Group has multiple areas entered. Review each Building’s Area Sheet and clear any areas that don’t belong. Once all areas are correctly assigned, the error should disappear.
- When I group by Building in the Detailed Summary, I see a group called “No Building.” Why?
This occurs when no Use Groups are assigned to Buildings, or if no Buildings exist in your estimate. Make sure you’ve created Buildings and assigned all Use Groups to the correct ones.
- I need a Use Group to apply across two Buildings. How can I do that?
You have two options:
- Leave the Use Group under Unassigned Floors (it will then appear under “No Building” in the Detailed Summary or Schedule of Values).
- Create a dedicated Building for that Use Group and name it accordingly (e.g., create a Building called “Site” and assign the Site Use Group to it). This way, it will display as “Site” when grouped by Building.
- I don’t see the Buildings dropdown in my Area Sheet, Unit Mix, or Rooms. Why?
The dropdown only appears if you have created Buildings in your estimate. Once you add Buildings, it will be available in these sections.
- When I group by Building, I see combined groups like “Building X, Building Y.” How do I separate them?
This happens when line items are tied to Use Groups spanning multiple Buildings. Reassign those line items to Use Groups linked only to the correct Building to separate them.
If you have any questions, feel free to contact our support team and we'll be happy to help!