Cost Trendline
At Ediphi, we understand that estimators and owners need more than just point-in-time cost snapshots, they need to see how costs have evolved throughout the entire project life cycle. Every time a primary estimate is submitted in Ediphi, a new version is created as an immutable, point-in-time record. Over time, these submissions accumulate across Milestones and tell the full cost story of a project.
Our Cost Trendline brings that story to life. It gives estimators and owners a single, interactive view of how project costs have tracked over time, how they compare against target values, and where the project stands today. This is especially important as projects move through multiple design phases, each with shifting scopes, revised estimates, and evolving expectations.
The Cost Trendline is part of the Project Overview section and brings together three key data layers:
- Estimate Submission History: every submitted estimate plotted as a data point on the trendline
- Project Value: the live primary estimate for the current milestone, shown in real time (aka where your project is at today)
- Target Values: the budgeted cost set for each milestone, visualized as teal bars
With the foundational work in place (Milestones, Estimate Submissions, and Target Values) we are now able to bring it all together and tell the complete cost story of a project life cycle.
In this article
The Cost Trendline Graph
The Cost Trendline graph is an interactive chart that lives at the top of your Project Overview page. It displays your project's estimate submission history alongside your current Project Value and milestone Target Values, so you can quickly see how costs are trending at a glance.

Graph Axes
The X-axis displays your project Milestones, ordered chronologically by milestone start date. Milestones are visually grouped by Design Stage (e.g., Schematic Design, Design Development), so you can see which phase each milestone belongs to.
The Y-axis displays cost values. You can toggle between two views:
- $ Total: the grand total of the estimate
- $ GSF: cost per gross square foot
Note: If you set the graph to display $ GSF and notice that some Milestones don’t show a Target Value, it may be because those Milestones are configured as Lump Sum Target Values rather than Estimate-based Target Values. In these cases, the platform does not calculate or display a GSF.
Data Points and the Trendline
The blue line connects data points to show how costs have evolved over time. There are two types of data points:
- Submitted Estimates (solid blue dots): each submitted estimate is shown as a solid blue dot. These represent immutable, point-in-time Versions of exactly what that estimate was at the time you submitted it to the owner and form the backbone of the trendline.
- Project Value (hollow blue dot): the live Primary estimate for the current Milestone, displayed as a hollow dot with a blue outline. This is not a submission; it reflects the estimate exactly as it stands today and updates in real time as changes are made to the estimate.
- When enabled, your Cost Model will appear as a purple bar on the trendline, plotted to the left of your estimate submissions. This allows you to see at a glance how your early cost expectations compare to how estimates have tracked over time.
Target Values (teal bars) are displayed as vertical bars behind the data points, representing the budgeted cost set for each milestone. This allows you to immediately see whether submitted estimates are tracking above or below the planned budget at any point in the project.

Cost Modeling on the Trendline
Your project's Cost Models can be displayed directly on the Cost Trendline as a data point, giving you a reference for the first inception of cost on a project; the starting point of your full cost story.
Toggling Cost Modeling on/off:
The Cost Modeling toggle is a user-level setting. Each team member can enable or disable it for their own view without affecting what others see. By default, the toggle will be on for all users.
Note: All other graph display settings remain user-specific. The only project-level setting is Manage Cost Trendline.
Making Cost Model data appear:
Having the toggle on does not automatically populate data. For a Cost Model data point to appear on the trendline, a user with Cost Model write access must:
- Open the Settings Menu and select Manage Cost Trendline.

- In the modal, locate the Cost Model row and toggle it on and click Apply Changes.

This action makes the Cost Model's data visible to everyone on the project. It functions similarly to how benchmarking surfaces data: you are intentionally electing to expose that Cost Model's value in the shared trendline view.
Note: You must have an existing Cost Model on the project before it can be enabled in Manage Cost Trendline.
What value is displayed:
The value shown for your Cost Model on the trendline reflects the current presentation of your Cost Model; meaning whatever grouping and Use Group filters are active within the Cost Modeling tool at the time. What you see in your Cost Model is what you get on the trendline.
- If you change the active grouping (e.g., from UF1 to UF2), the value shown on the trendline will update accordingly.
- If you filter out Use Groups, only the filtered total will be reflected.
This is an important concept: the trendline is always a live mirror of how your Cost Model is currently presented.
Graph Controls and Settings
Use the controls at the top right of the graph to customize your view:
- $ Total / $ GSF toggle: switch between displaying total cost or cost per gross square foot on the Y-axis.
- Settings Menu (≡ icon) — opens a dropdown with additional display and filtering options.

Inside the Settings Menu, you can:
- Show/Hide elements: toggle the visibility of Design Stage labels, Cost Model, Target Values, and/or the Project Estimate (live dot) on the graph.
- All Submissions vs. Last Submitted: choose whether to display every submitted estimate per milestone (all data points), or only the most recent submission per milestone for a simplified view. This setting controls both the number of dots shown and how the trendline is drawn.
- Milestone Range: display All Milestones, or select a Custom date range using two drop-downs.

Note: All settings in the graph are user-specific; your display preferences do not affect what other team members see. The only exception is Manage Cost Trendline, which is a project-level setting and will apply to everyone viewing the cost trendline.
Manage Cost Trendline
Users Write permissions to Estimates will see an additional Manage Cost Trendline option in the Settings Menu. Selecting it opens a modal that allows you to show or hide specific submissions and/or cost models from the Cost Trendline.

Some important things to know about Submissions:
- The Manage Cost Trendline setting applies to the entire project, not just your personal view.
- Hiding a submission removes it from the graph view but does not delete it; submissions cannot be deleted.
- All other graph toggles and display settings are user-specific.
- Only Primary estimates can be submitted. This ensures the trendline reflects a single, consistent baseline over time rather than multiple parallel estimate tracks.
- Anyone with Write access or above can submit an estimate; you do not need to be a Project Owner.
- All trendline values are Grand Total values that include all markups, above and below the line, as seen from the owner's perspective.
- Submitted estimates are immutable; changes made to the source estimate after submission do not affect historical data points on the trendline. Only the live Project Value dot adjusts in real time.
Target Values
A Target Value represents the budgeted cost for a given Milestone. Setting Target Values is what allows you to track cost performance over time, making it immediately visible whether your estimates are tracking above or below budget.

Setting a Target Value
Target Values are set on the milestone itself. When creating or editing a milestone, you can assign a Target Value using one of three source types:
| Source | Behavior | Best For |
|---|---|---|
| Lump Sum | Static dollar amount (e.g., $5,000,000) | Manual entry; top-level comparison only |
| Estimate (Version) | Immutable snapshot of a specific estimate Version | Tracking against a locked baseline; supports WBS-level breakout |
| Cost Model | Live reference that updates as the cost model changes | Tracking against the initial application of cost on a project |
Once saved, the Target Value immediately populates as a teal bar in the Cost Trendline, even before any estimate Submissions exist for that Milestone.
How Target Values Behave
- A Target Value can be set or updated at any time. If you update a Milestone's Target Value (e.g., from $100M to $120M), the graph will always reflect the most recent value.
- For lump sum values, you can edit the amount directly.
- For estimate-based values, the amount is driven by the selected Estimate and Version. To update it, you’ll need to change the Estimate/Version it references rather than editing the value directly.
- For cost model values, the platform will pull in the current total of the selected Cost Model as it is currently presented. The teal Target Value bar on the trendline will reflect this value.
- Estimate-based Target Values are the most powerful option; they support WBS-level breakout in the SOV section (by UniFormat, MasterFormat, Bid Package, etc.).
- Lump Sum Target Values provide a top-level dollar comparison only and do not support detailed WBS breakout in the SOV chart.
- Cost Models are built per grouping (e.g., UF1, UF2). For the SOV section to display a full side-by-side comparison between your estimate and the Cost Model Target Value, both must be using the same grouping.
-
If the groupings do not match, you will see a banner notification in the SOV section indicating the mismatch. In this state, only the estimate data is displayed; no delta column and no dual-bar comparison.
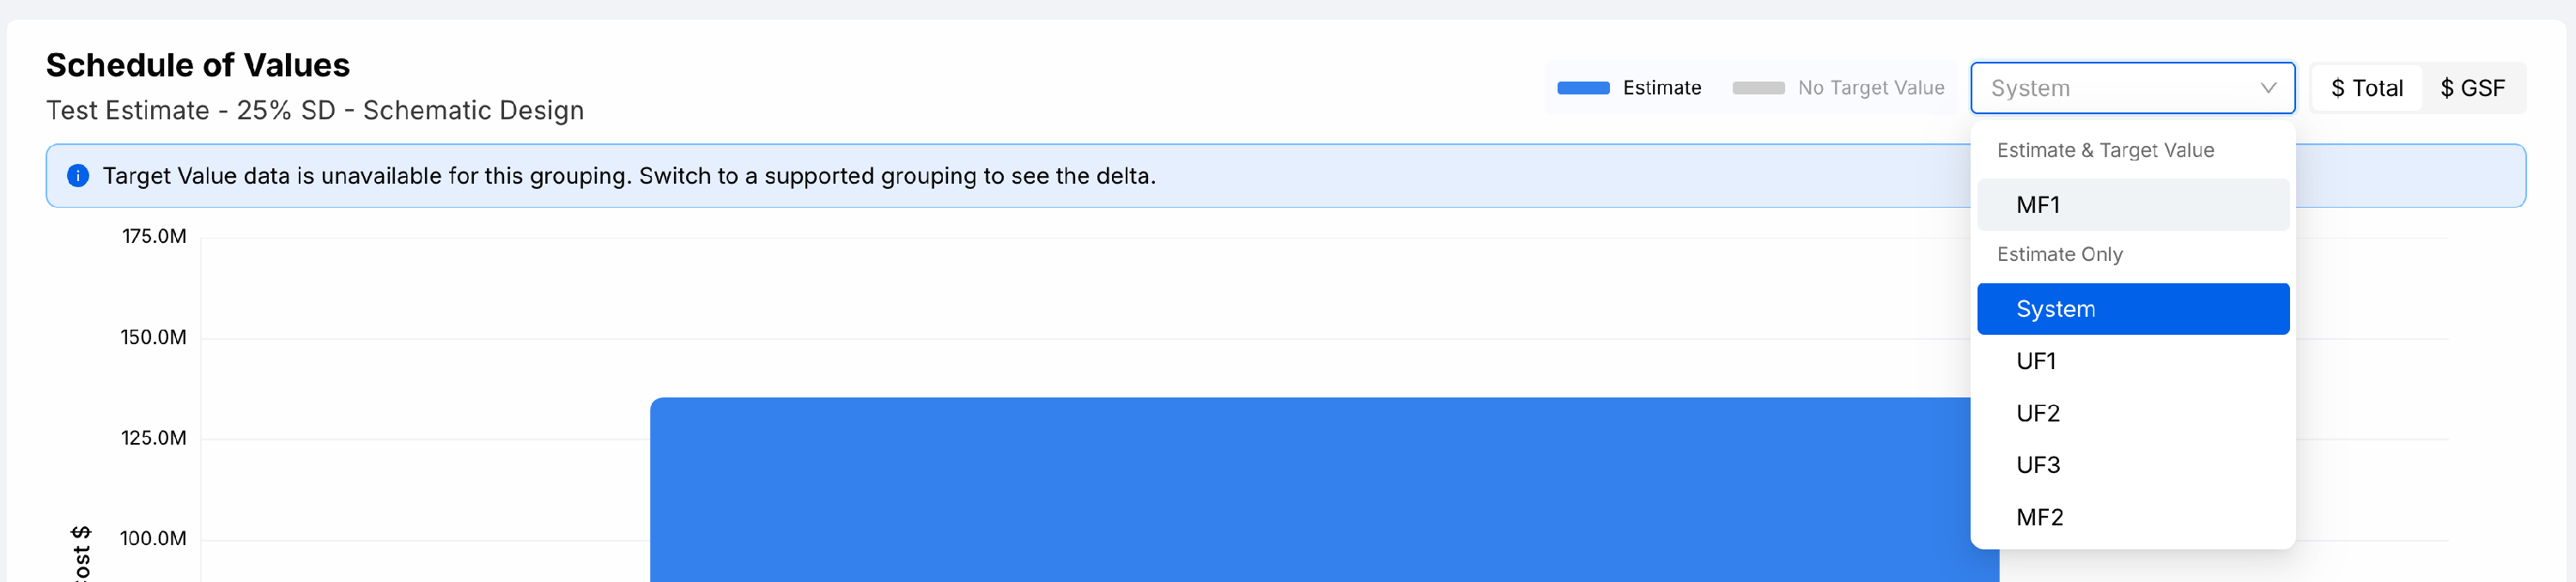
- Switching to the grouping that matches your Cost Model will restore the full comparison view, including the delta column and dual-bar breakdown.
- Example: If your Cost Model is built in UF1 and your estimate is currently grouped by UF2, the SOV section will show estimate data only. Switching your estimate grouping to UF1 will unlock the full Cost Model vs. Estimate comparison.
-
- When creating a new Milestone, the Target Value field will be pre-populated based on the most recent milestone in the project (by start date). You can always modify or clear this before saving.
Pro Tip: Ediphi recommends using estimate-based Target Values whenever possible. This approach allows you to track budgeted costs against your estimates at a detailed WBS (Work Breakdown Structure) level, giving you much greater visibility into performance.
If you use a lump sum Target Value, the total can only be tracked at a high level and cannot be broken down or compared at a granular level.
Using estimate-based Target Values provides more flexibility and deeper insight, making it the preferred option for most workflows.
Schedule of Values (SOV) Section
Below the Cost Trendline graph, you will find the Schedule of Values (SOV) section. This section provides a detailed cost breakdown for whichever estimate or cost model is currently selected in the graph.
Default View
When you first load the Project Overview, the SOV section automatically displays data for the Primary estimate in the current Milestone; the same estimate that drives the Project Value (live dot) in the trendline.

Selecting a Specific Submission
Click any dot on the Cost Trendline to load that submission's data into the SOV section below. This allows you to explore the detailed cost breakdown for any historical submission across any Milestone.

Overview Cards
At the top of the SOV section, three summary cards are displayed for the selected estimate:
- Target Value: the Target Value set for the Milestone where the selected estimate lives.
- Grand Total: the total cost of the selected estimate, with an indicator showing whether it is over or under the Target Value.
- Cost / GSF: the cost per gross square foot for the selected estimate, also compared against the Target Value.

SOV Chart (Bar Graph)
Note: The SOV breakout graph shows costs for the selected estimate, with all displayed amounts including any above-the-line markups.
The SOV Chart visualizes costs broken down by your selected WBS grouping. Here is how it works:
- X-axis: WBS categories (e.g., Bid Package, MasterFormat, UniFormat), ordered by their default sequence. Project and Company-level sort fields enabled will work as Grouping options.
- Y-axis: cost values. Toggle between $ Total and $ GSF using the control at the top right of the chart.
- Blue bars: actual estimate values for each WBS category.
- Teal bars: the Target Value for each WBS category. These only appear when an Estimate-based Target Value has been set for the milestone.

Use the WBS dropdown to switch between different breakdown views (Bid Package, MasterFormat, UniFormat, etc.).

The SOV section now supports Cost Model comparisons when a Cost Model is set as the Target Value for a Milestone.
When groupings match:
- A delta column is visible in the SOV table, showing the difference between the estimate and the Cost Model for each line.
- Dual bars appear in the SOV chart (one for the estimate and one for the Cost Model) so you can immediately see where costs are differing.
- The Target Value card at the top of the SOV section will display the name of the Cost Model set as the target.
When groupings do not match:
- A banner appears at the top of the SOV section indicating that the Cost Model and estimate are not on the same grouping.
- Only estimate data is shown. The delta column and dual-bar comparison are hidden until the groupings align.
Note: Markup columns will show dashes for individual line items when a Cost Model is set as the Target Value. This is expected behavior; markups in a Cost Model apply only to the total, not to individual use groups.
SOV Table
Below the SOV Chart, a detailed table displays all line items grouped by the selected WBS field. The table includes:
- A Total column showing the combined value across all Use Groups.
- A Delta column showing the difference between the Total and the Target Value.
- Individual columns for each Use Group in the selected estimate.
- A Markups Total row summarizing all below the line markups included in the estimate (above-the-line markups are automatically added to the WBS displayed in the SOV).
- A Grand Total row at the bottom reflecting the total cost including all markups.

Note: The SOV table is read-only. Estimate values cannot be edited from this view.
Permissions
Permissions for Cost Trendline are tied to each user's role and estimate access level on the project. Here is a breakdown of what each role can do:
|
|
Global Admin | Project Owner | Member (Write - Cost Model + Estimates) | Member (Write - Estimates) | Member (Read - Estimates) |
|---|---|---|---|---|---|
| View Trendline | ✓ | ✓ | ✓ | ✓ | ✓ |
| Interact with Graph/Toggle Settings | ✓ | ✓ | ✓ | ✓ | ✓ |
| View Cost Model on Trendline | ✓ | ✓ | ✓ | ✓ | ✓ |
| Manage Submissions | ✓ | ✓ | ✓ | ✓ | ✗ |
| Submit an Estimate | ✓ | ✓ | ✓ | ✓ | ✗ |
| Enable Cost Model in Manage Submissions | ✓ | ✓ | ✓ | ✗ | ✗ |
| Set Cost Model as Target Value | ✓ | ✓ | ✓ | ✗ | ✗ |
FAQs
Why is my Cost Trendline empty?
The Cost Trendline requires at least one Milestone and one submitted estimate assigned to that Milestone. If you have not yet created Milestones or submitted any estimates, you will see an empty state prompting you to get started. Without Milestones, users will see a prompt to create an estimate and assign it to a Milestone.
What is the difference between the solid blue dot and the hollow blue dot?
Solid blue dots represent submitted estimates; historical, immutable point-in-time snapshots. These live inside of your Version History for that estimate. The hollow blue dot (with a blue outline) represents the Project Value (aka your current, most up to date working estimate), which is the live primary estimate for the current Milestone. It updates in real time as the estimate changes and is not a submission.
How many times can I submit an estimate per milestone?
There is no limit. You can submit an estimate as many times as needed within a Milestone; each submission creates a new data point on the Cost Trendline. Use the All Submissions vs. Last Submitted toggle to control how many data points are displayed at once.
Can I delete a submitted estimate?
Submissions are permanent records and cannot be deleted within the Cost Trendline. However, if the source estimate of the submission is deleted in the project, the submission will also be deleted. Project Owners can always hide specific submissions from the graph view using the Manage Submissions option in the Settings Menu. Hiding a submission removes it from the visual display without deleting the underlying data (or the estimate).
Why can only Primary estimates be submitted?
Restricting submissions to primary estimates ensures the Cost Trendline reflects a single, consistent baseline over time rather than multiple parallel estimate tracks. This keeps the trendline readable and meaningful as a cost story.
Does editing my estimate after submission change the trendline?
No. Once an estimate is submitted, that Version is locked as an immutable snapshot. Any edits made to the source estimate afterward are only reflected in the live Project Value dot; not in any previously submitted data points on the trendline.
What happens if I update a milestone's Target Value after submissions already exist?
The Cost Trendline will immediately reflect the updated Target Value. The graph always shows the most recent Target Value; it does not retain a history of previous target values.
Why does my new Milestone's Target Value look pre-filled?
When creating a new milestone, Ediphi pre-populates the Target Value field based on the most recent milestone in the project (by start date). This is a convenience feature to save time. You can always modify or clear the pre-filled value before saving.
Can I see the Cost Trendline if I only have read-only access to the project?
Yes. Read-only users can view the Cost Trendline and interact with graph toggles and display settings. The only action they cannot take is Manage Submissions, which is reserved for Project Owners and Global Admins.
What does it mean when a user has no estimate permissions?
Users without estimate read permissions will see the Project Overview page but will not have access to the Cost Trendline or any cost data. They are limited to general project-level information only.
I set my Target Value as an estimate but it has me selecting a previous or a new Version, why?
When using an estimate-based Target Value, you’re asked to select a Version because Target Values are tied to a specific snapshot of the estimate. This ensures the Target Value remains stable over time. If the underlying estimate is later updated, the Target Value will not change unless you explicitly select a different Version.
When you create a Target Value, the platform either creates a new Version or uses an existing one (if selected), and that Version will appear in the estimate’s version history.
Do I have to use Target Values?
No. Target Values are optional for each milestone. However, setting a Target Value can be helpful for comparing against actual costs and understanding how your project is trending over time.
I set a Lump Sum Target Value but I'm not seeing WBS breakout in the SOV chart. Why?
WBS breakout in the SOV chart only appears when an estimate-based Target Value has been set for the Milestone where the selected estimate lives. Lump Sum Target Values only provide a top-level dollar comparison and do not support WBS-level breakout. Additionally, only WBS types that have been enabled for your project will appear in the SOV chart dropdown.
Why are markup values showing as dashes in the SOV table when I'm using a Cost Model as my Target Value?
This is expected behavior. In a Cost Model, markups apply to the overall total, not to individual use groups. Because of this, individual markup columns will show dashes when the Target Value is a Cost Model, rather than an estimate.
Why can't I see the delta column or dual-bar comparison in the SOV section after selecting a Cost Model Target Value?
The delta column and dual-bar comparison only appear when your estimate's active grouping matches the grouping your Cost Model was built in (e.g., both in UF1 or both in UF2). If a banner appears at the top of the SOV section, it means there's a grouping mismatch. Switch your estimate to the same grouping as the Cost Model to restore the full comparison view.
If I change my Cost Model after setting it as a Target Value, will the Target Value update?
Yes. Unlike an Estimate-based Target Value (which is tied to a specific immutable Submission), a Cost Model Target Value is a live reference. It will reflect the current presentation of your Cost Model, including any changes to grouping, use group filters, or manual edits.
Do I need to lock my Cost Model before using it as a Target Value?
No, locking is not required. However, if you want to prevent future edits from changing the Target Value, you can lock the Cost Model. See the Setting Up a Cost Model article for details on locking.
If you have any further questions, feel free to contact our support team and we'll be happy to help!