Using Units in an Estimate
Ediphi's cloud infrastructure enables users to transition effortlessly from Use Groups to Unit Mix to Systems. This foundation allows for the easy retrieval of past scopes, facilitating the rapid creation of detailed estimates—even with sparse client details. We believe this accelerates the decision-making process, and shortens the time spent in pre-construction.
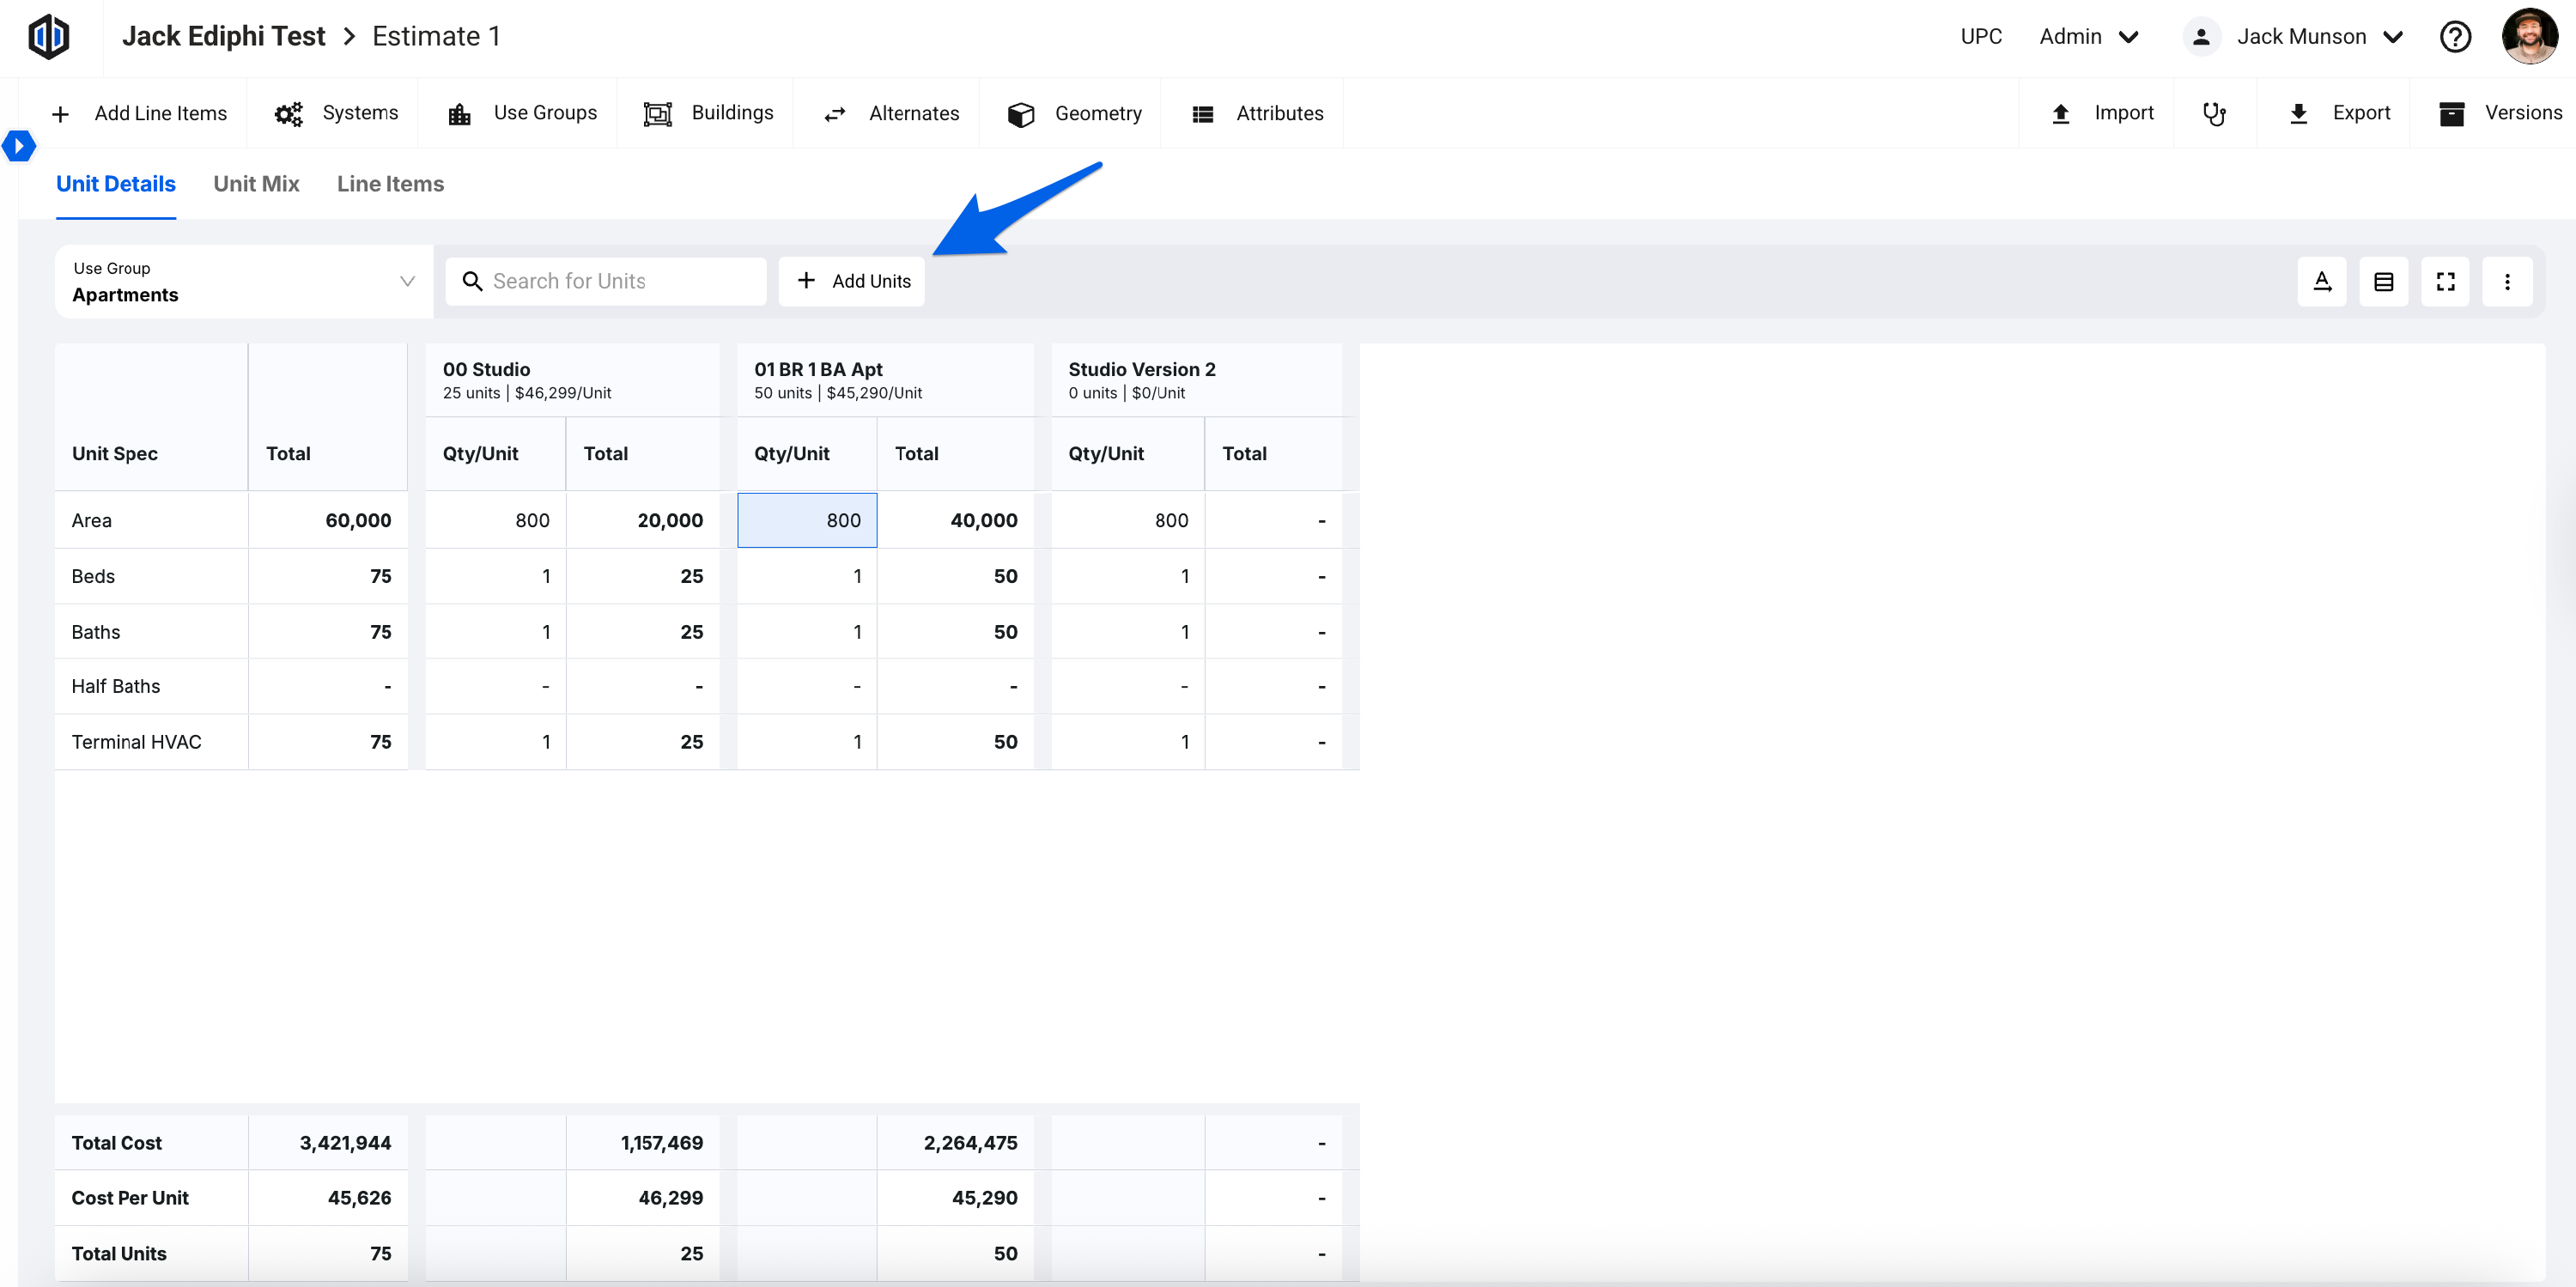
We’ll go over some of the basics of the Units tab. To start out, ensure that you’ve selected the correct Use Group that you want to work in:

In this article
The Units tab is split between 3 sections: Unit Details, Unit Mix, and Line Items. Each section tells a different story that comes together to complete the Units workflow and ties back to your estimate.
Managing Units
Within Units, you have the ability to add, edit, and remove Units, in addition to some other useful actions.
Adding Units
- Open any Units section within the Units tab.
-
Click the + Add Units button.
- You’ll then be prompted to add units within the Add Units modal.
-
Here you can (1) manually add units, (2) paste units from your browser/worksheet's clipboard, or (3) pull in existing Units saved to your company's database, known as Templates.
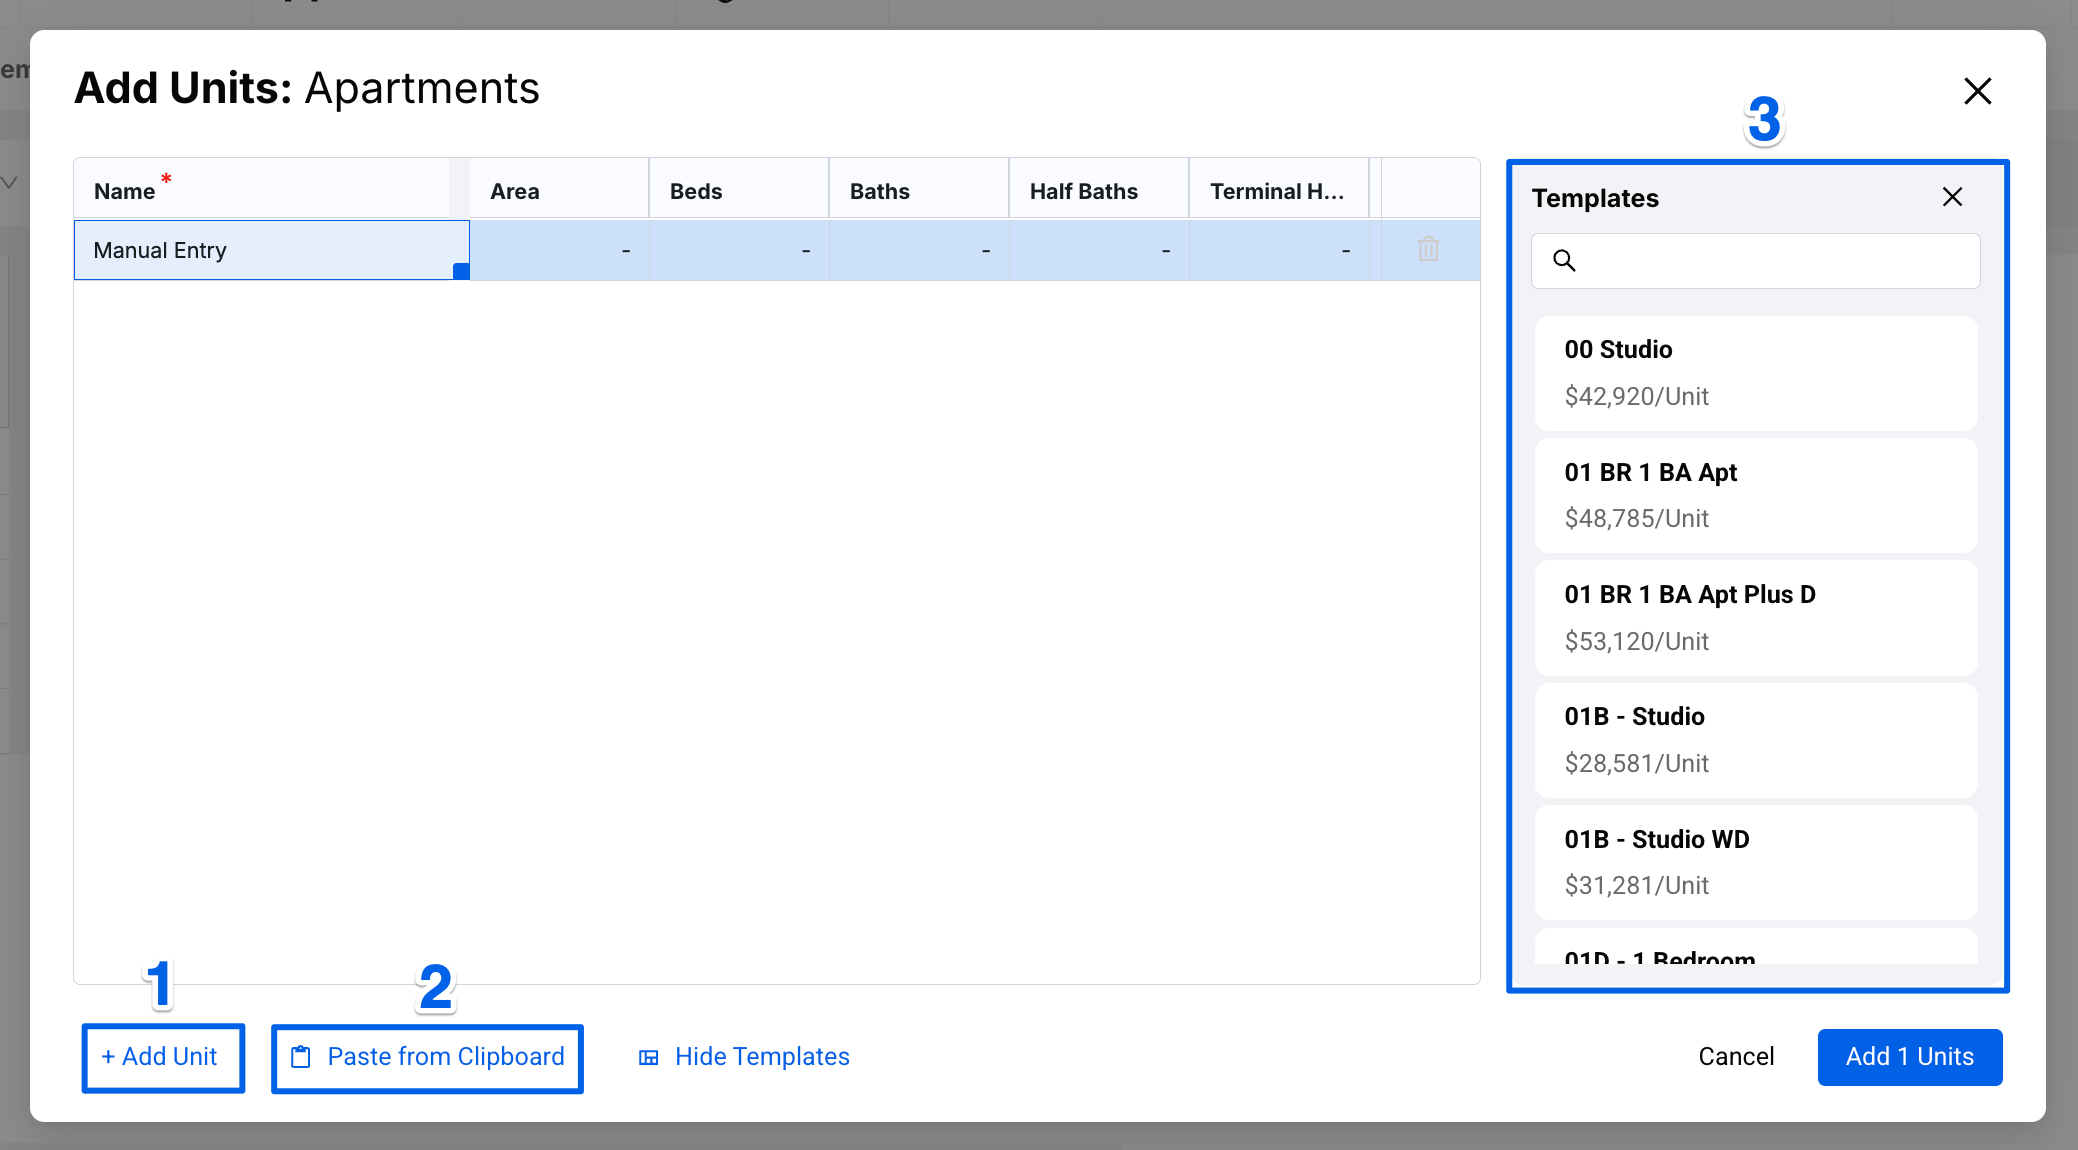
- After entering your unit information, click on Add Units.
- Once Units have been added, you can then specify how many times it appears on each floor within the Unit Mix, adjust the specs in the Unit Details, and manage line items associated with the Units in the Line Items.


Note: For managing Unit Specs, please review our Unit Specs article.
Duplicating Units
-
Click the 3 dots (ellipses) on the desired unit and select Duplicate Unit.
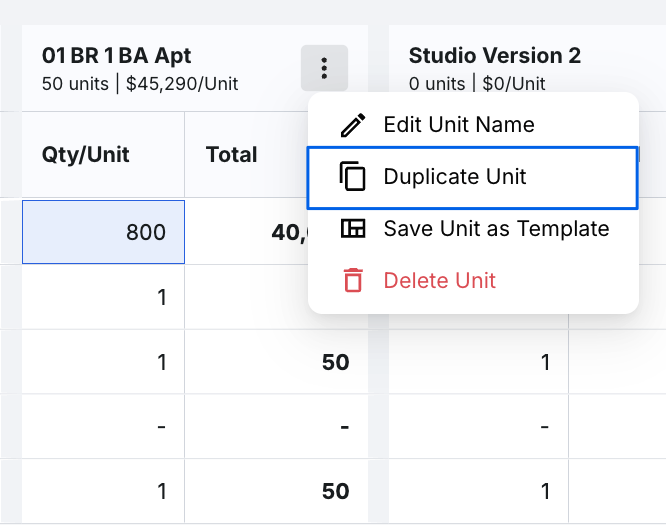
-
A pop-up will appear, prompting you to enter the name and select the destination Use Group for the duplicated unit. Be sure to verify that you're copying it to the correct Use Group. You can choose from any existing Use Groups that match the same Unit Specs. Once confirmed, click Save.


Note: This duplicate will include the same Qty/Unit data and line items associated with the unit and will show in the Line Items section. However, you will need to plug in the total quantity in the Unit Mix on every floor for the duplicate unit.
Saving Units as Templates
Only Global Admins have the ability to save units as templates. Saved unit templates live in Units under the Admin menu per Use Group.
-
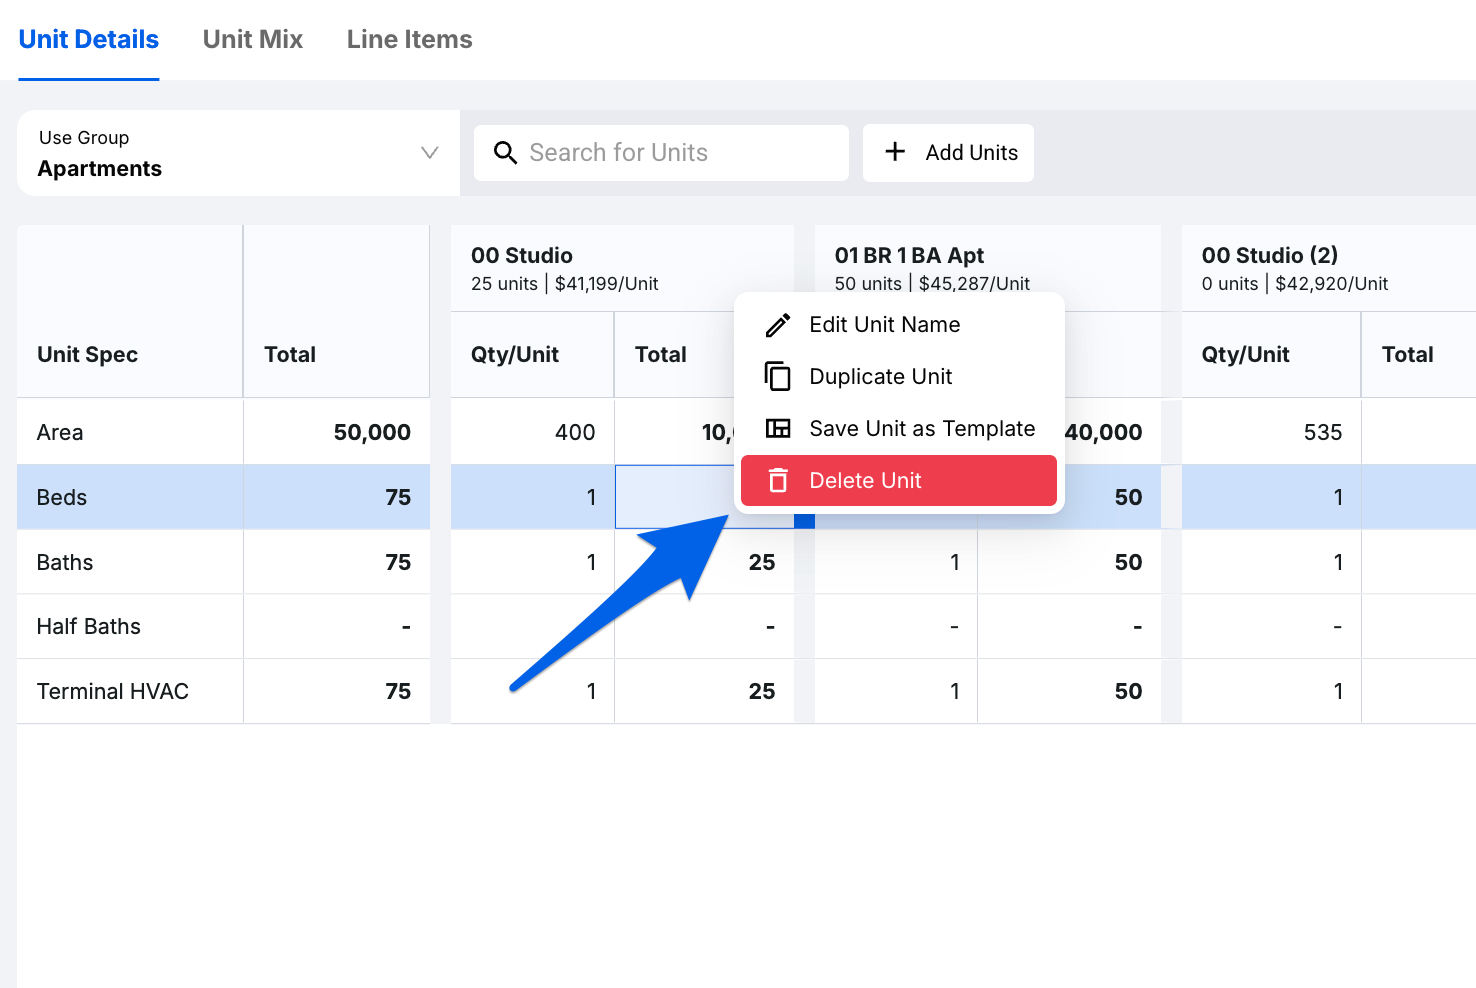
Click on the 3 dots (ellipses) of the specific unit you would like to save as a template. Select Save Unit as Template.
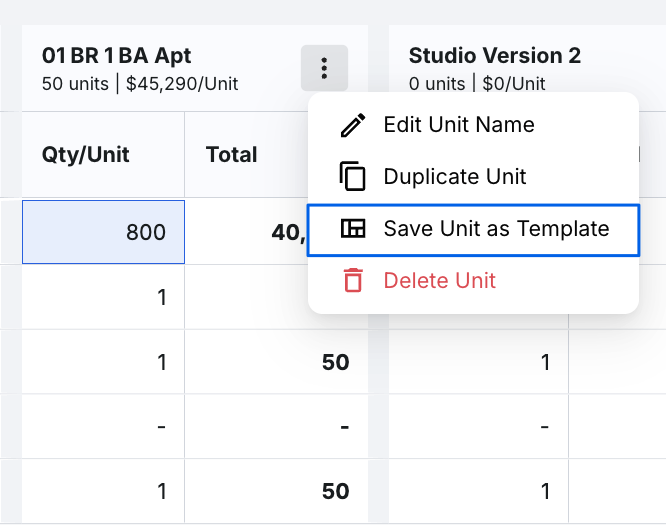
-
A modal will appear confirming the name of the template. Click Save as Template.
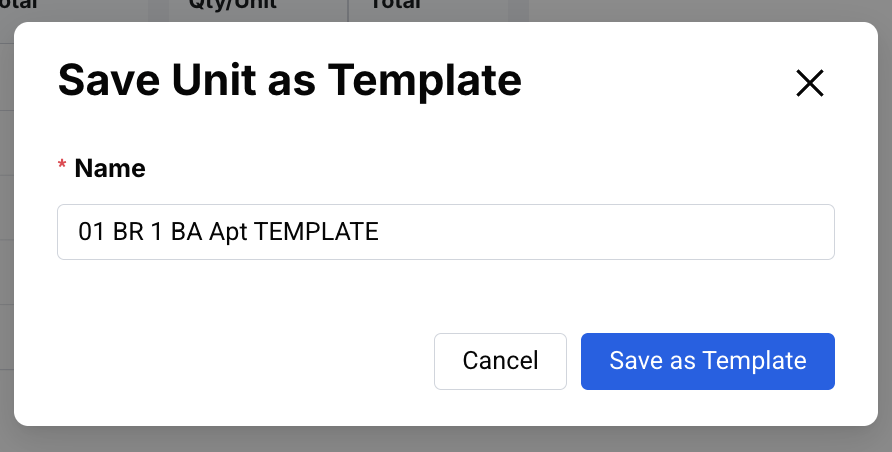


Now, when adding more units, this saved unit will show in the Templates section of the Add Units modal.
Deleting Units
-
Click on the 3 dots (ellipses) of the specific unit you would like deleted. Select Delete Unit.
-
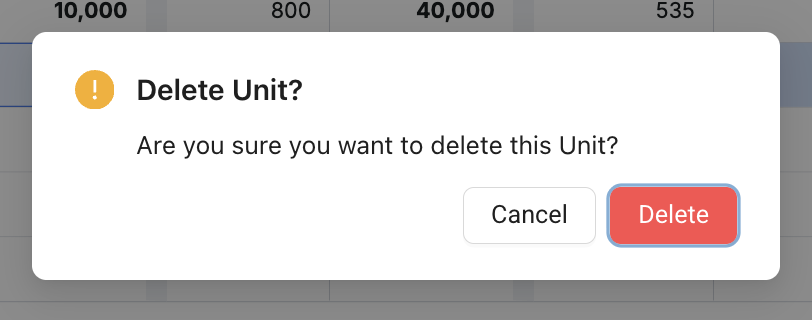
A pop-up will appear confirming you want this unit deleted. Click Delete.


Using Buildings with Units and Common Items
Note: Buildings are optional and can be added via the Buildings menu option above the estimate. See our Understanding Buildings article to learn more.
After creating Buildings, you can assign Use Groups to them via the Manage Use Groups modal or the Area Sheet per floor. After doing so, you can now organize your Units and Common Items per Building. Here's how to it:
Units
- Open the Units tab.
- Select Unit Mix.
- Click the Buildings dropdown, and select which building to work on. This will then automatically select the topmost linked Use Group within that building.
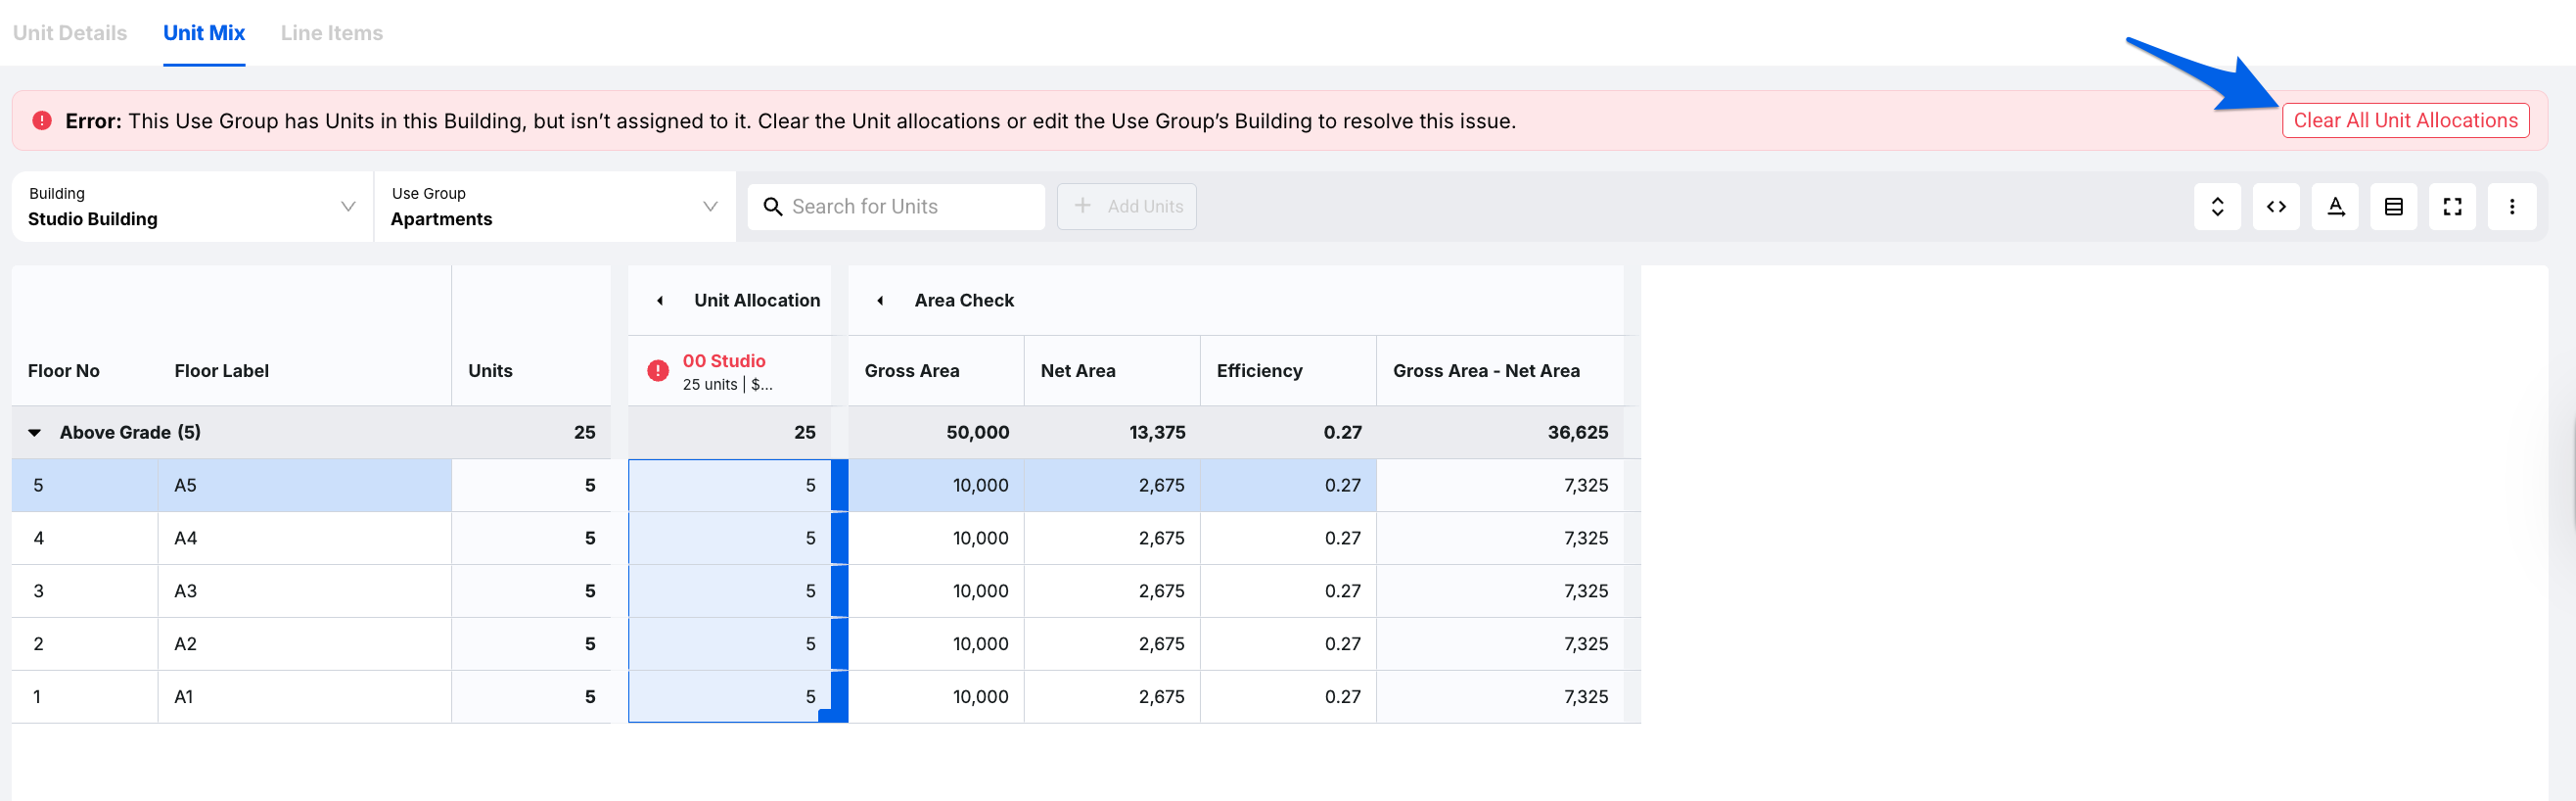
- If you have one or more Units of the same type in multiple buildings, a warning will appear letting you know to free up those units. There are two routes to fix this:
-
Duplicate the Unit and transfer the info to the new unit type. Then, delete the original unit with the warning.
-
Clear the Unit Mix allocations in the building(s) the Use Group is not assigned to by either manually removing the allocations, or by clicking the button in the red banner labeled "Clear All Unit Allocations".
-


Common Items
- Open the Common Items tab.
- Select either Common Walls or Common Areas.
- Click the Buildings dropdown, and select which building to work on. This will then automatically select the topmost linked Use Group within the building.
- If you select a Building that has Use Group totals allocated to it as well as another Building, you will see a warning message asking you to free up these totals. Here's how to fix it:
-
Clear the Common Item total in the Building(s) the Use Group is not assigned to by clicking the button in the red banner labeled "Clear All Quantities".
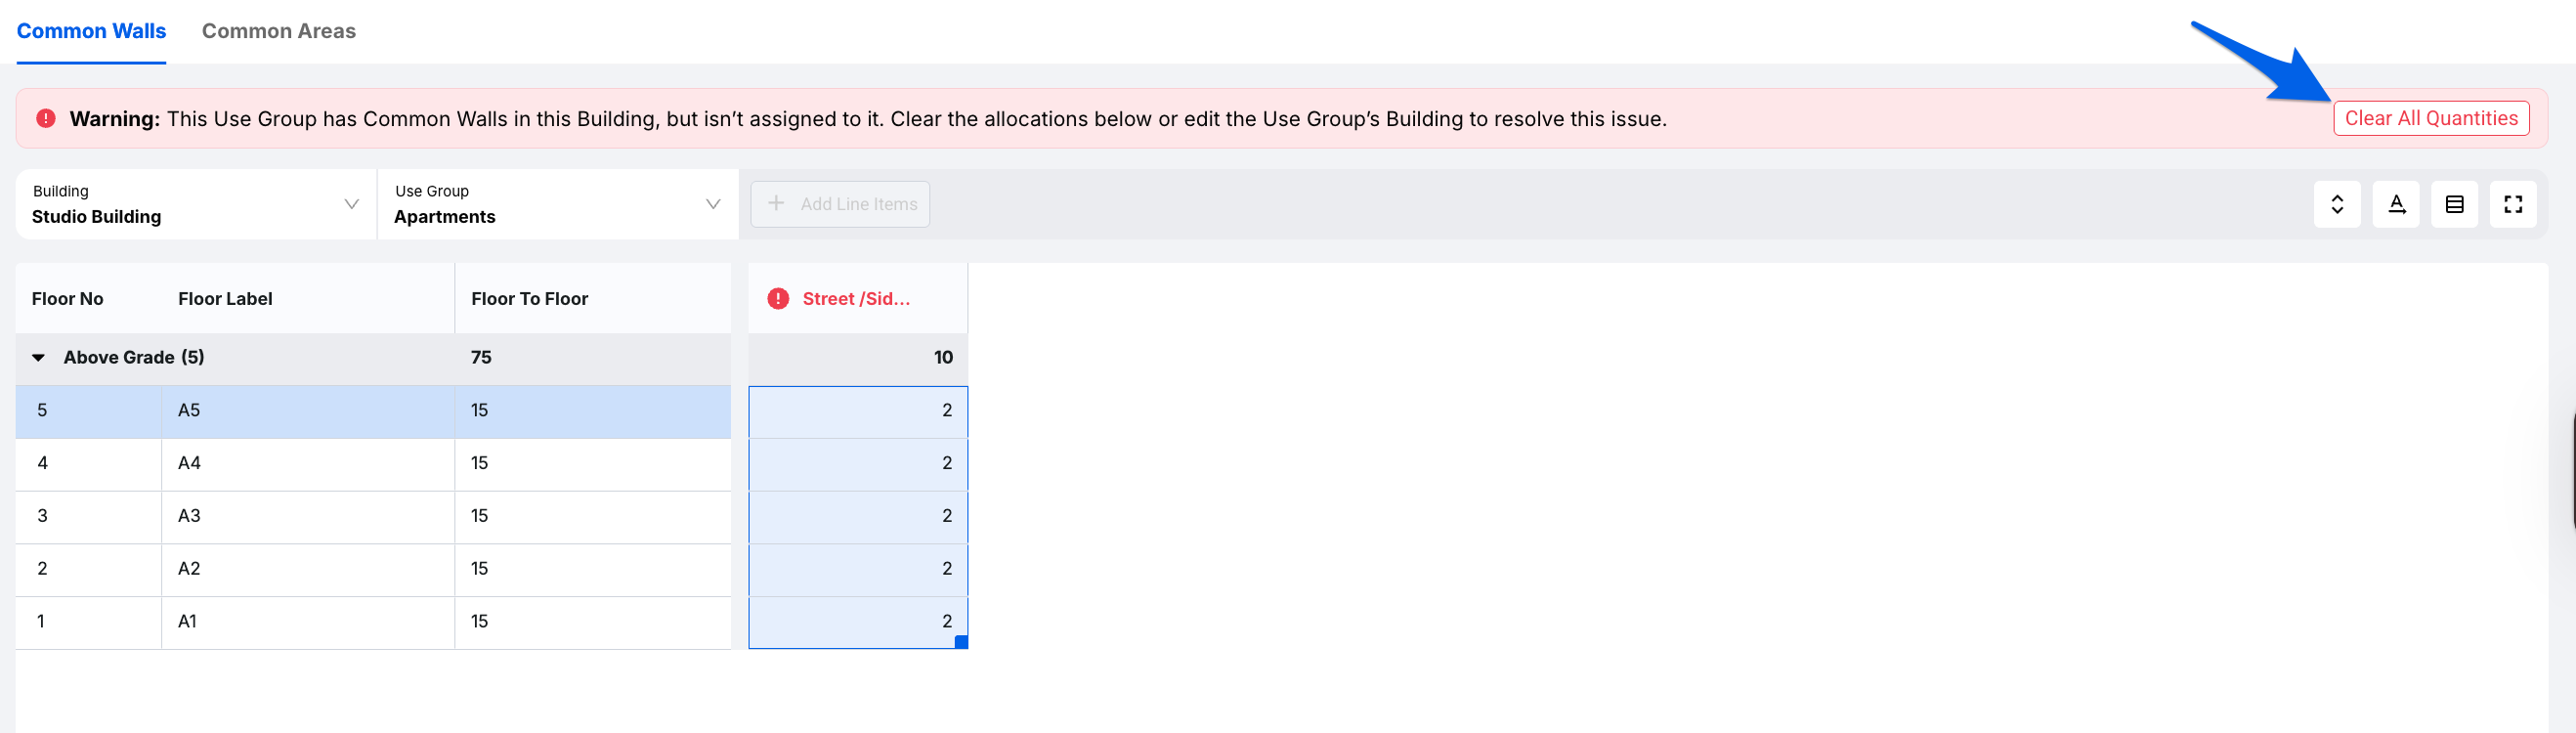
-
Navigate to the Use Groups menu option and select Manage Use Groups. Here you can re-assign the Building to the correct Use Group to free up the error.
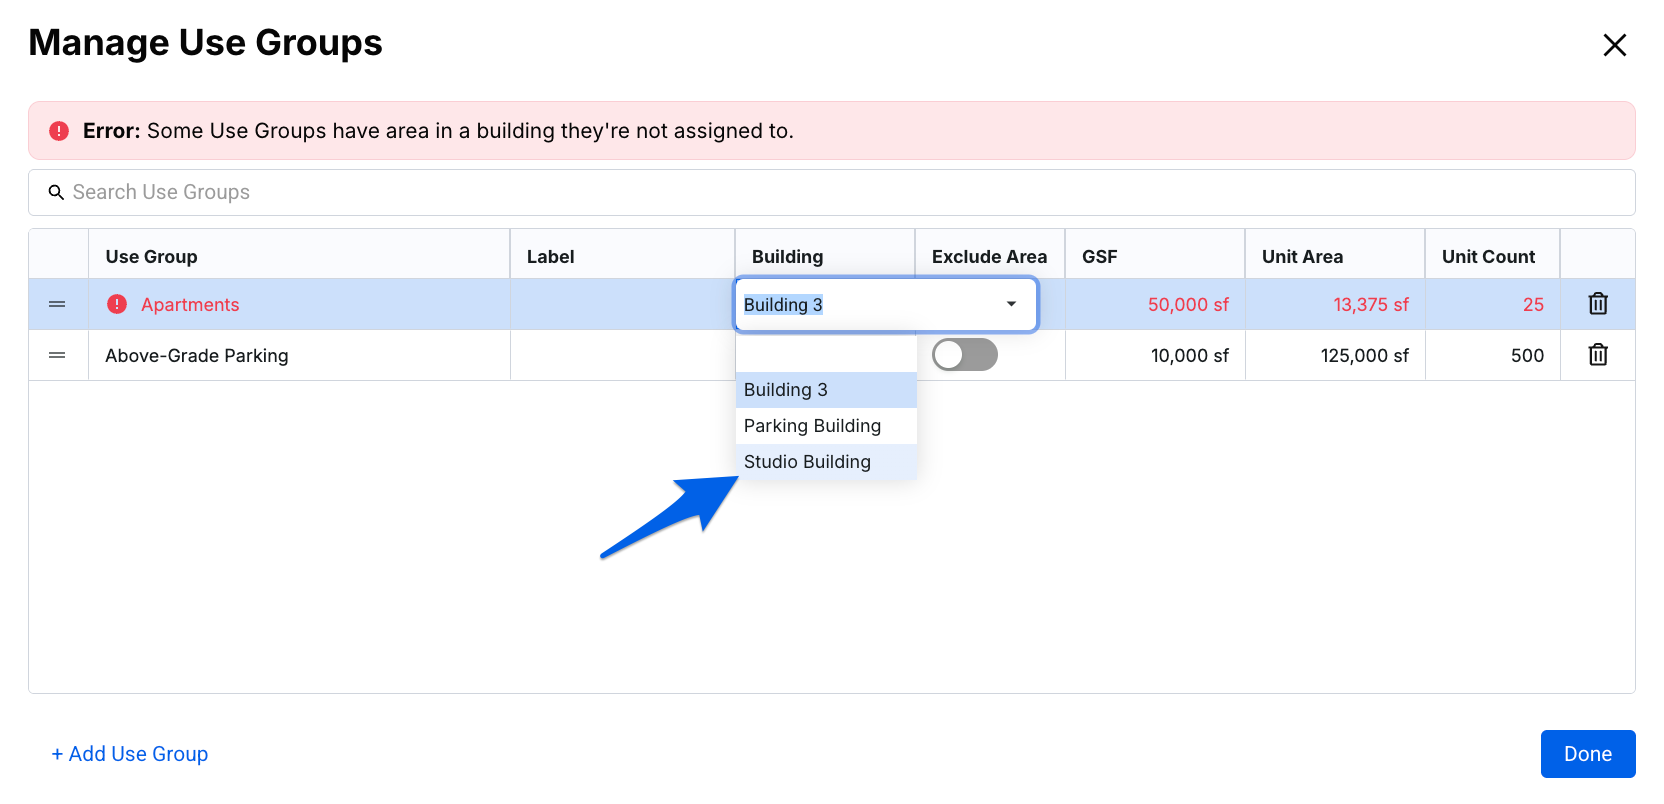
-


Unit Details
Cost is the most important factor in estimating. Unit Details gathers the information needed from the Unit Mix and Line Items to show accurate cost and spec data per Use Group. In Unit Details, you can provide the spec quantity per unit. For example, in a studio apartment, there’s only one bed. Since that’s the only unit spec in that category, the quantity per unit is 1.
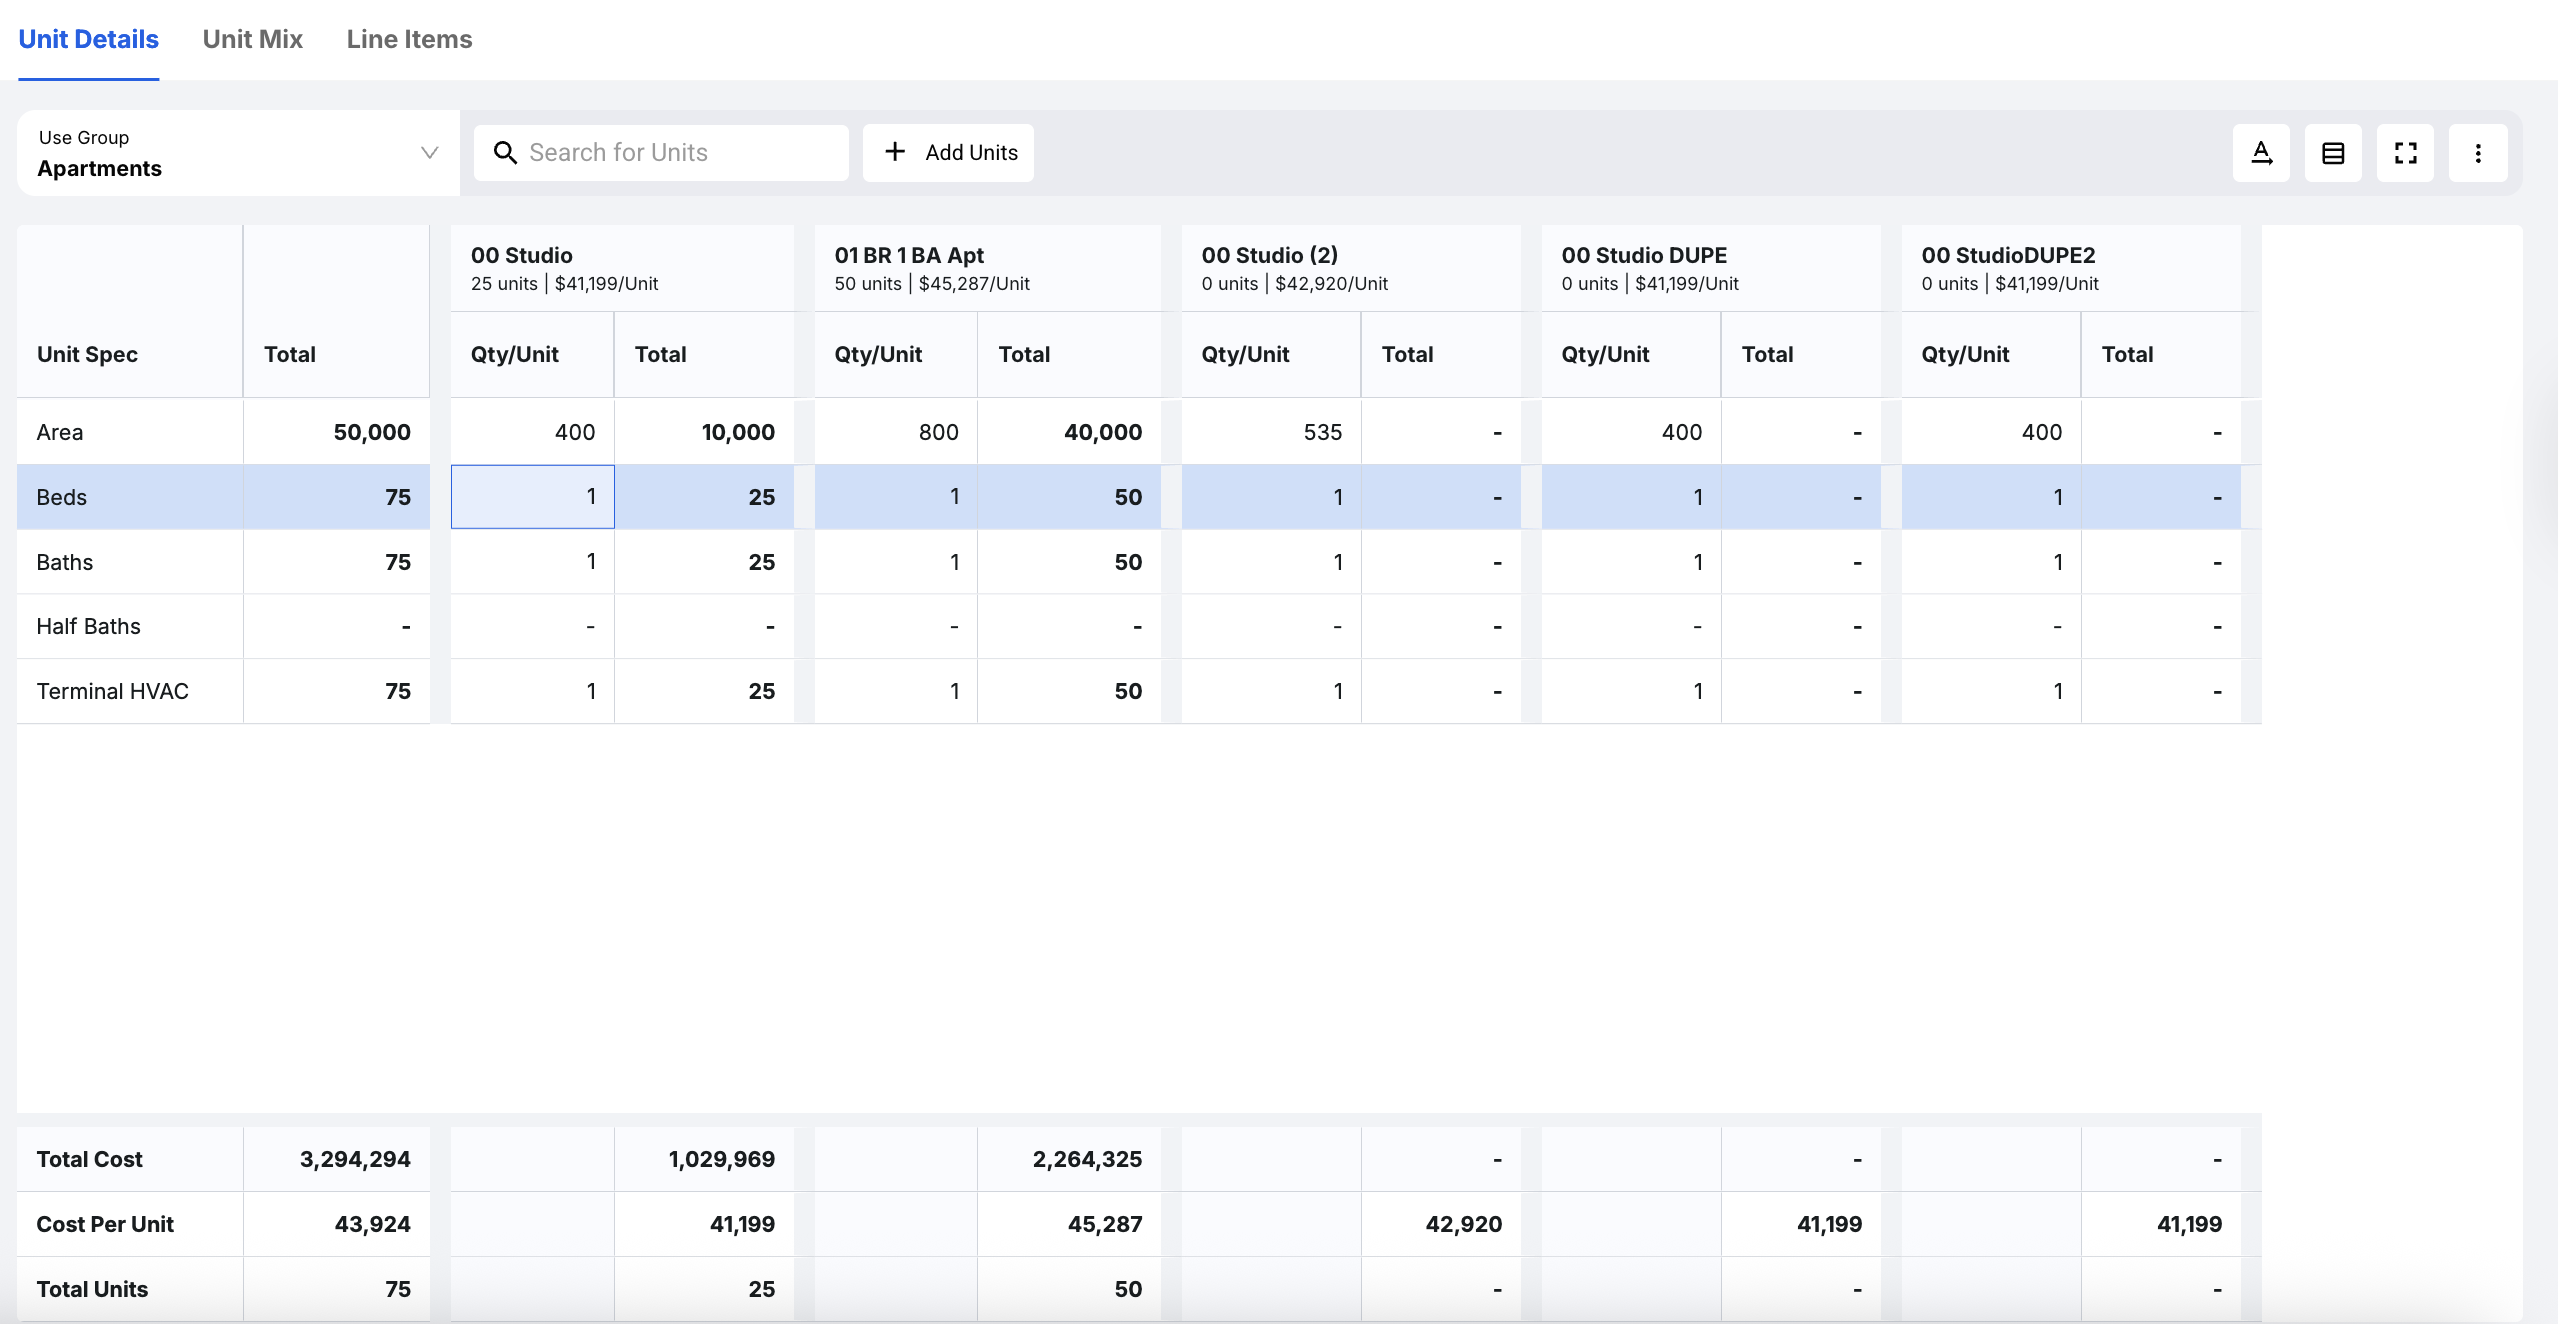
Unit Details allows you to view the Unit Specs, such as Area. In the example below, we are looking at the Apartments Use Group. Here, we have specified how many Beds, Bathrooms, and Half Baths each unit type has:
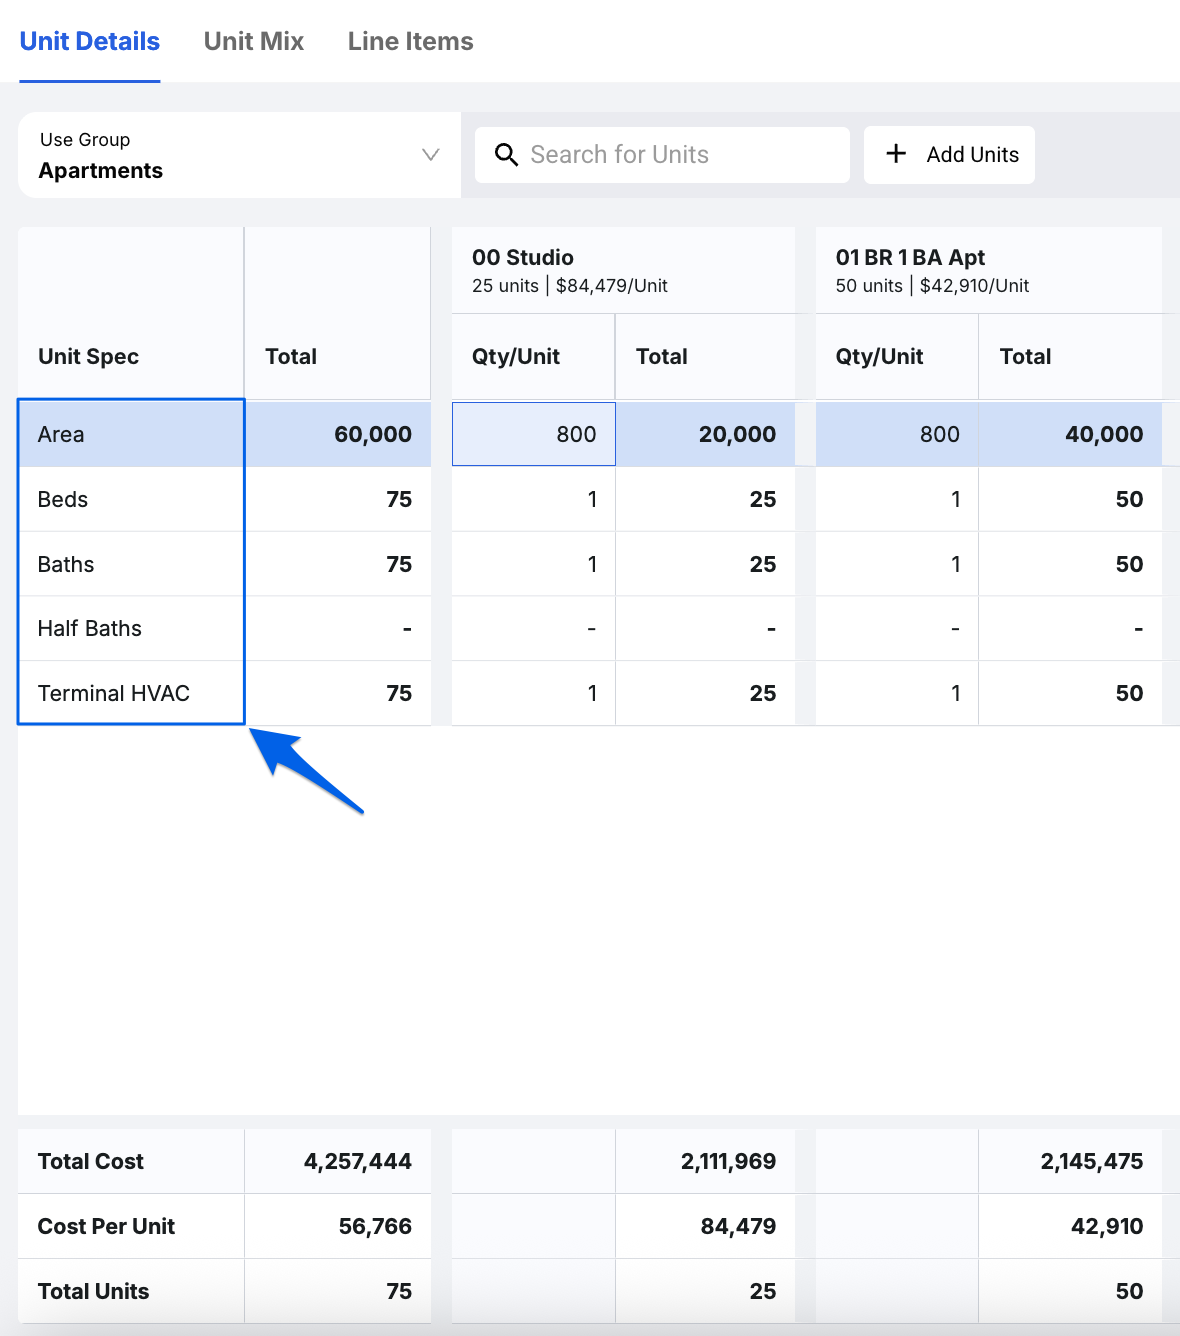
At the bottom of Unit Details, we can find our Totals: Total Cost, Cost per Unit, and Total Units. This Totals panel is visible on all areas of Units for better visibility while you work.

Pro Tip: Unit Count, Cost/Unit, and Total Units are a standard throughout Units automatically, however, they are able to be re-labeled if you wish. In the Admin section, you can edit the name of the Unit by editing the Use Group and adding a Unit Label. See how to Edit Use Groups.
For example, if you update a Unit Label to Apartments, Unit Count will now read Apartment Count, Cost/Unit now reads Cost/Apartment, and Total Units now reads Total Apartments. It has replaced the word Unit with the word Apartments throughout the module.
Unit Mix
The philosophy of data accessibility extends to Unit Mix. A unit mix describes the composition of the various repeating units in an estimate, like the number of one-bedroom one-bathroom units in a condo. This concept applies to any type of repeating units based on the project type. For instance, in school construction, classrooms might be your unit mix, whereas in hospital projects, exam rooms might recur. The unit mix and its related details and line items can be tailored based on your project type and saved in your cloud database.
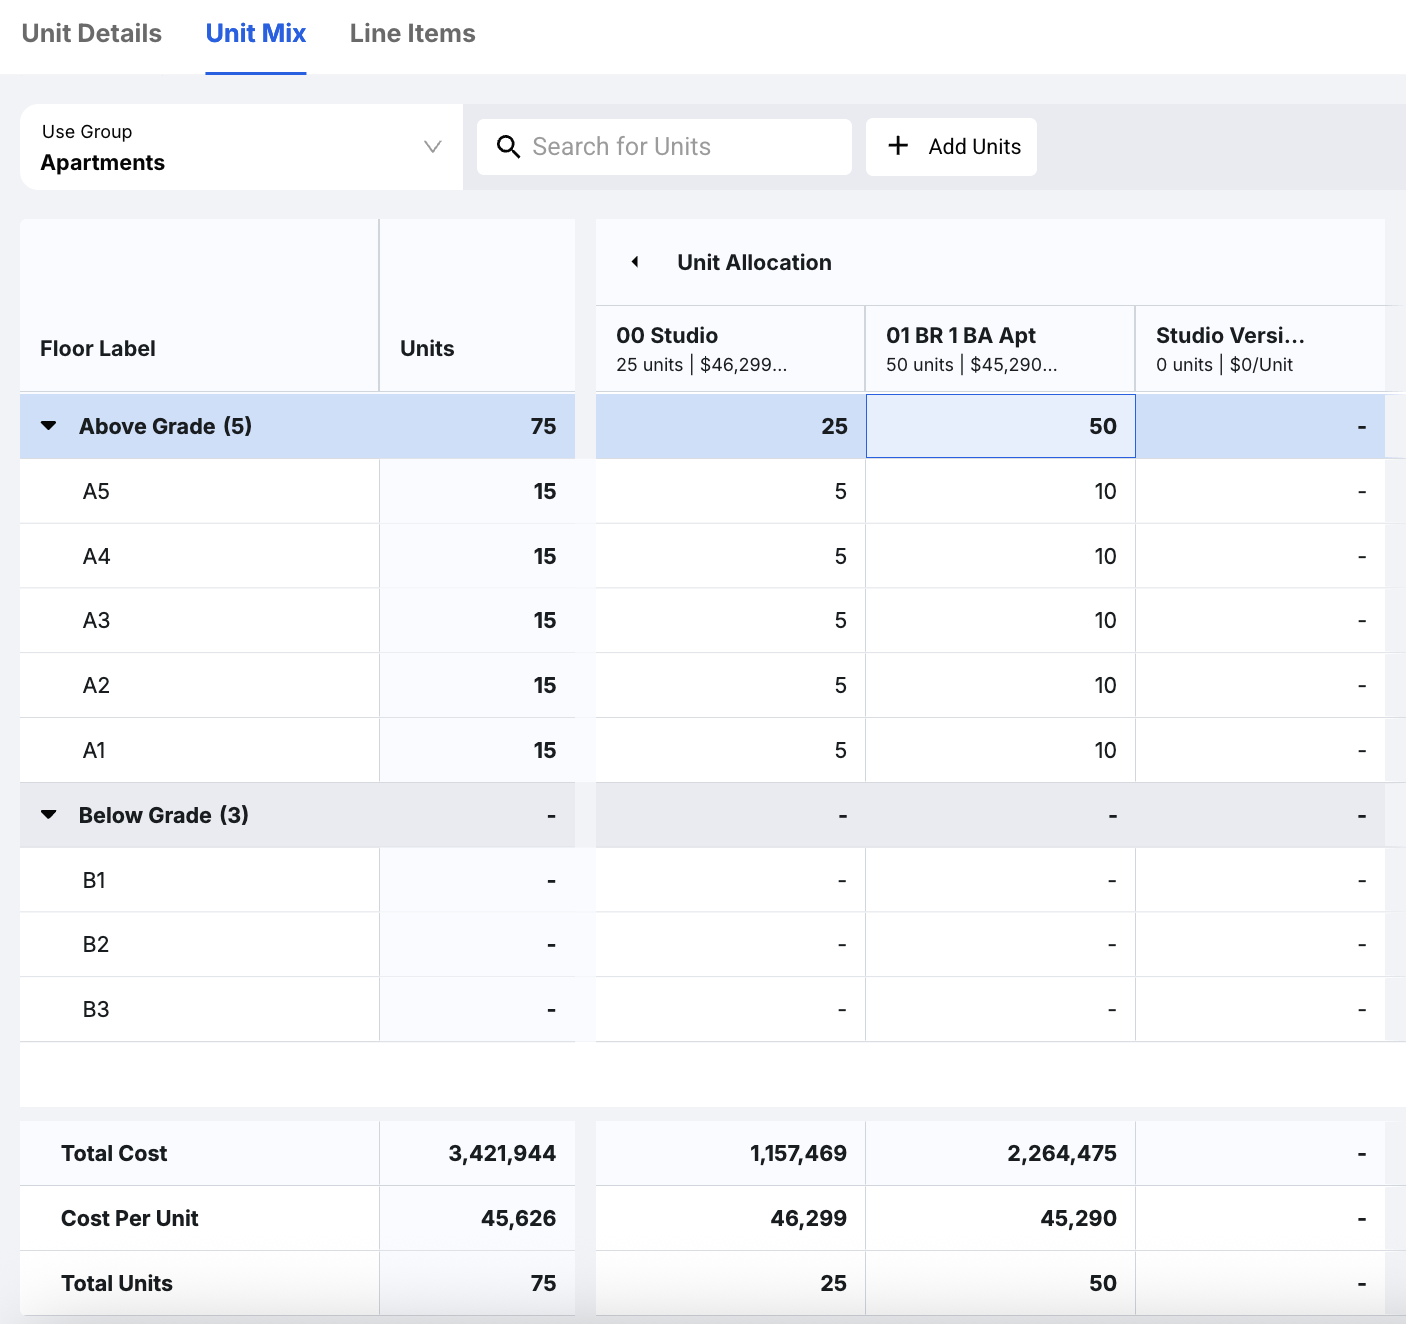
Let's look at an example. In our Apartment Use Group, we have pre-loaded two types of units: a studio apartment and a one-bedroom apartment:
Unit Allocation
The Unit Mix allows you to allocate which floors contain these types of units. Here you can double-click into each cell to assign a quantity on either the Above Grade levels or the Below Grade levels, depending on which Use Group you are working in:
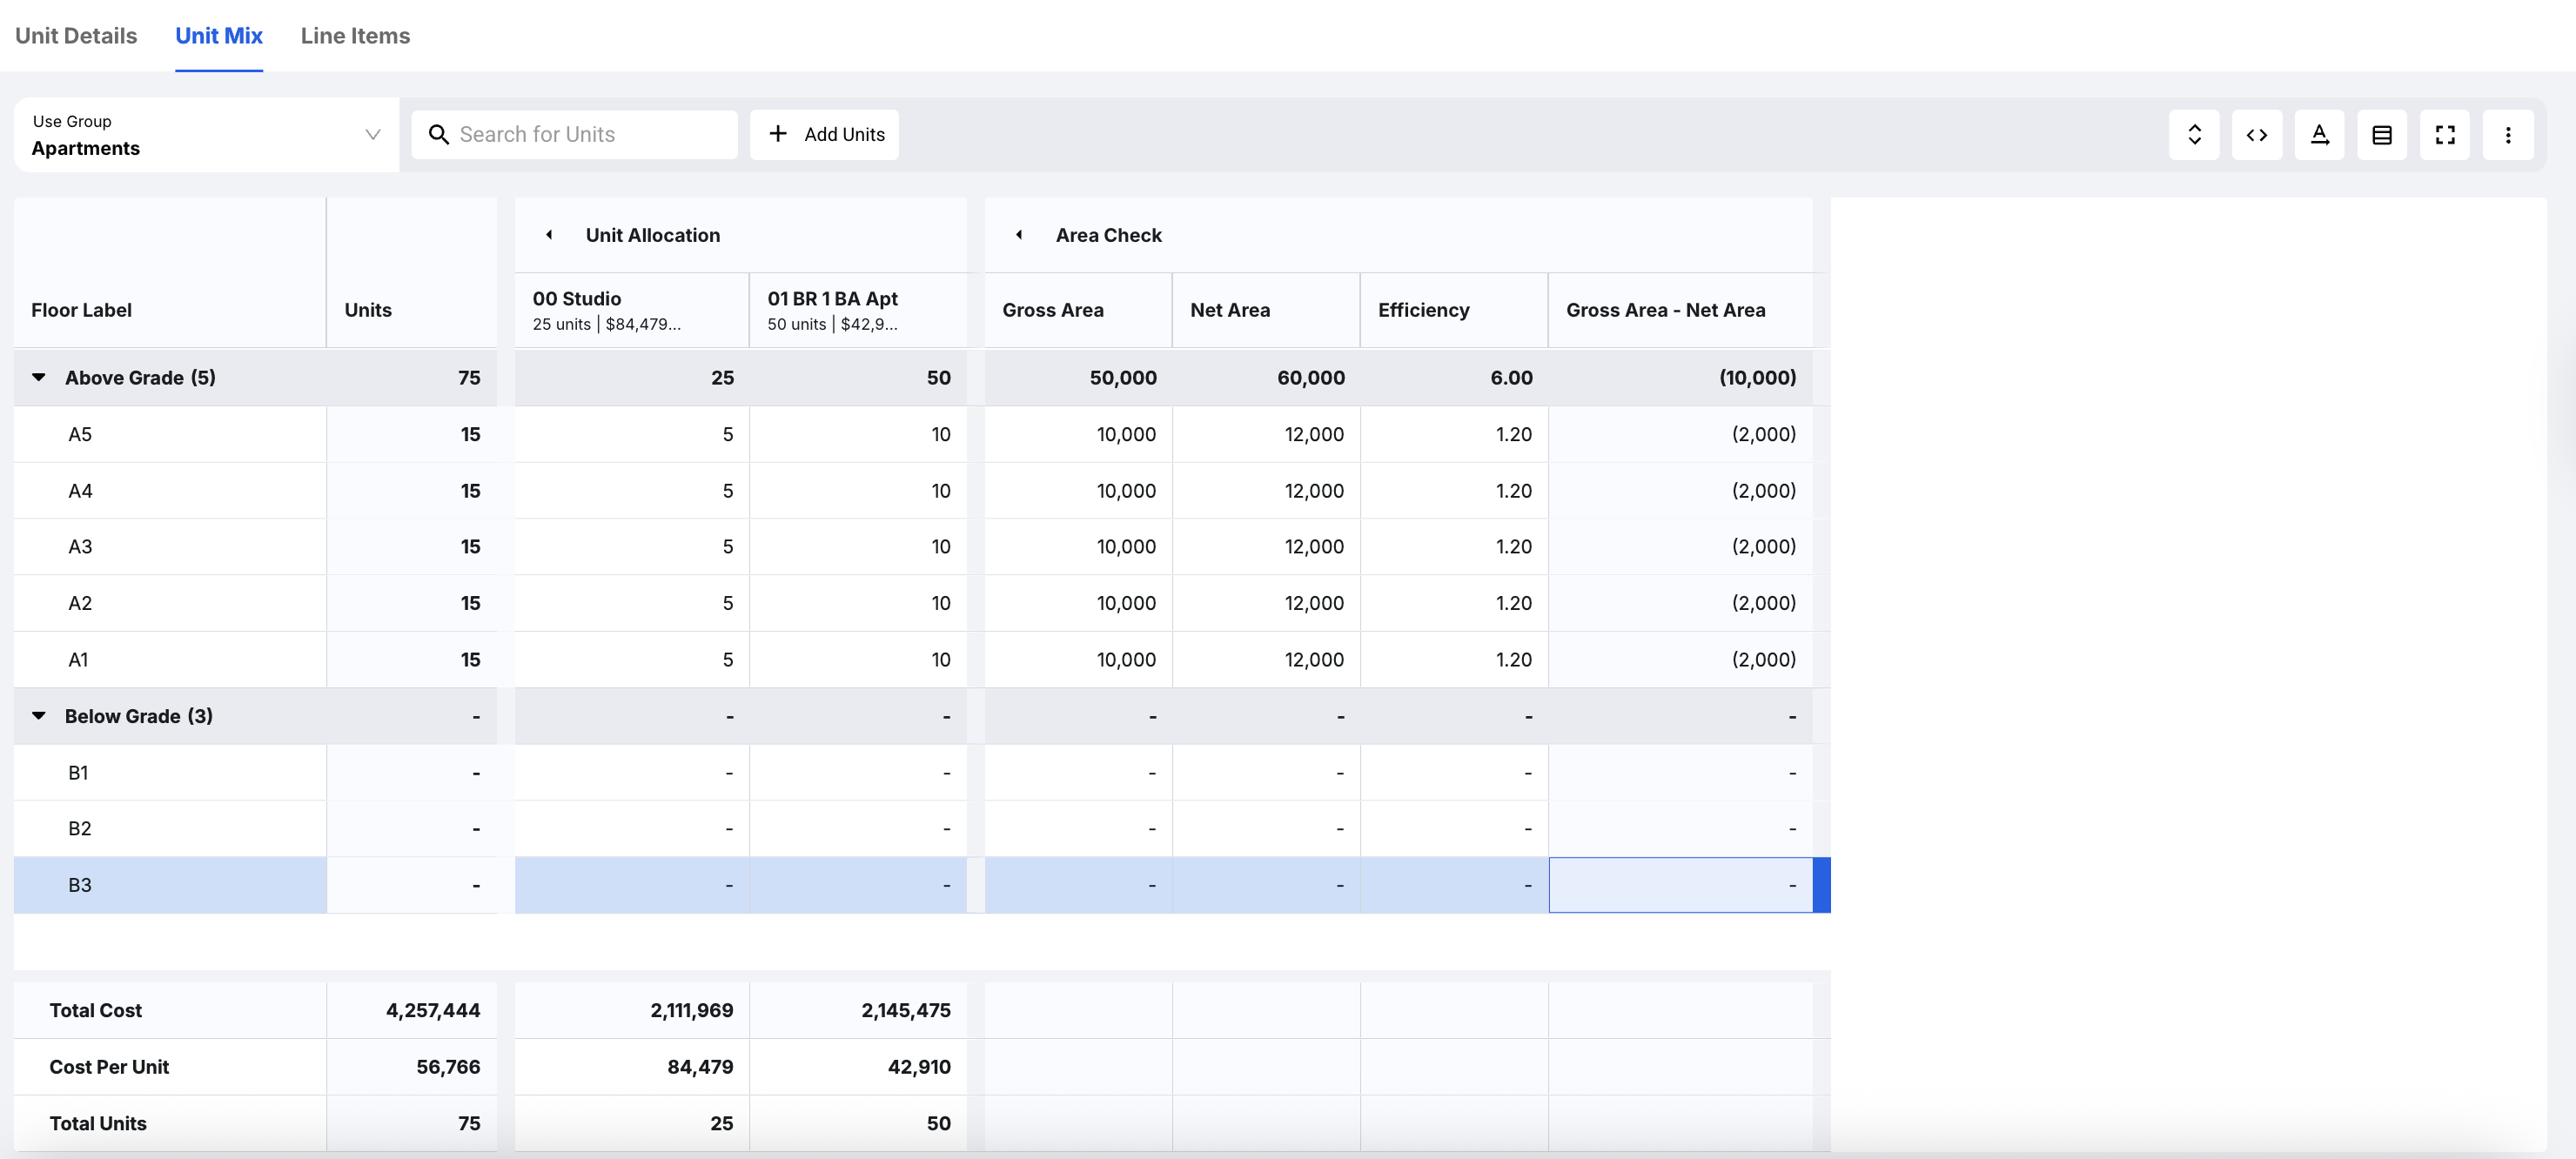
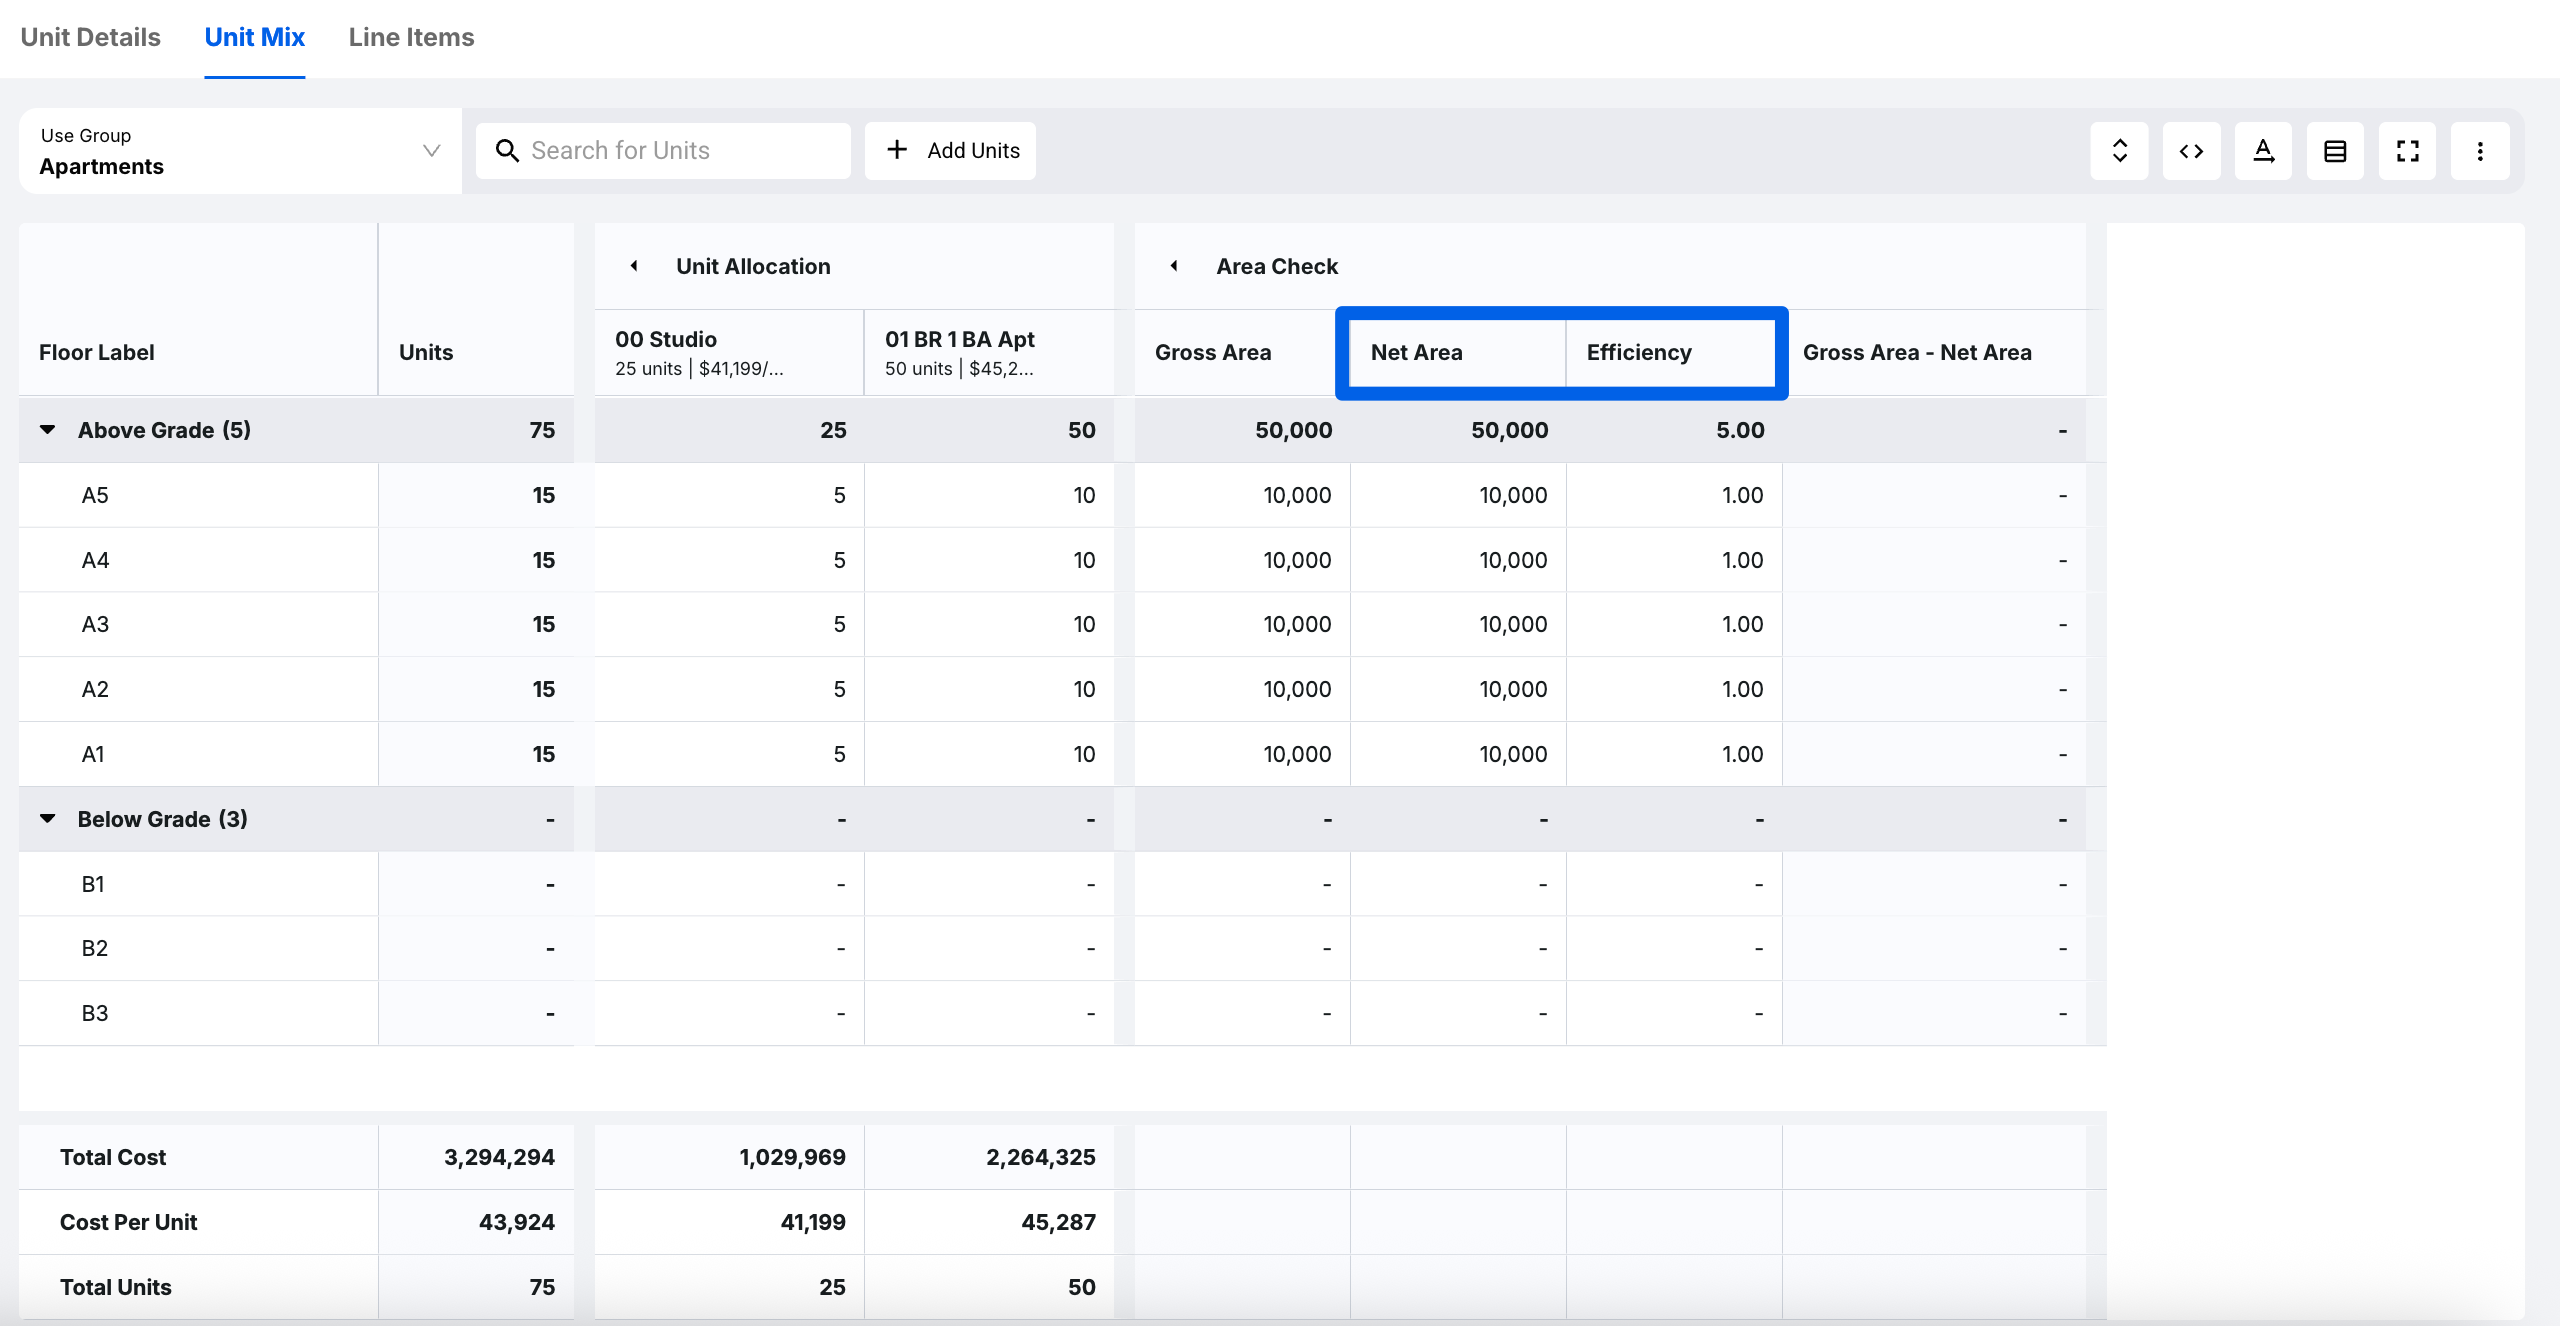
Area Check
Another useful feature for the Units tab is the Area Check. The Area Check allows us to view the Net Area and the Efficiency of a given floor, which is particularly helpful when communicating to a client how well used the space is per floor.
Line Items
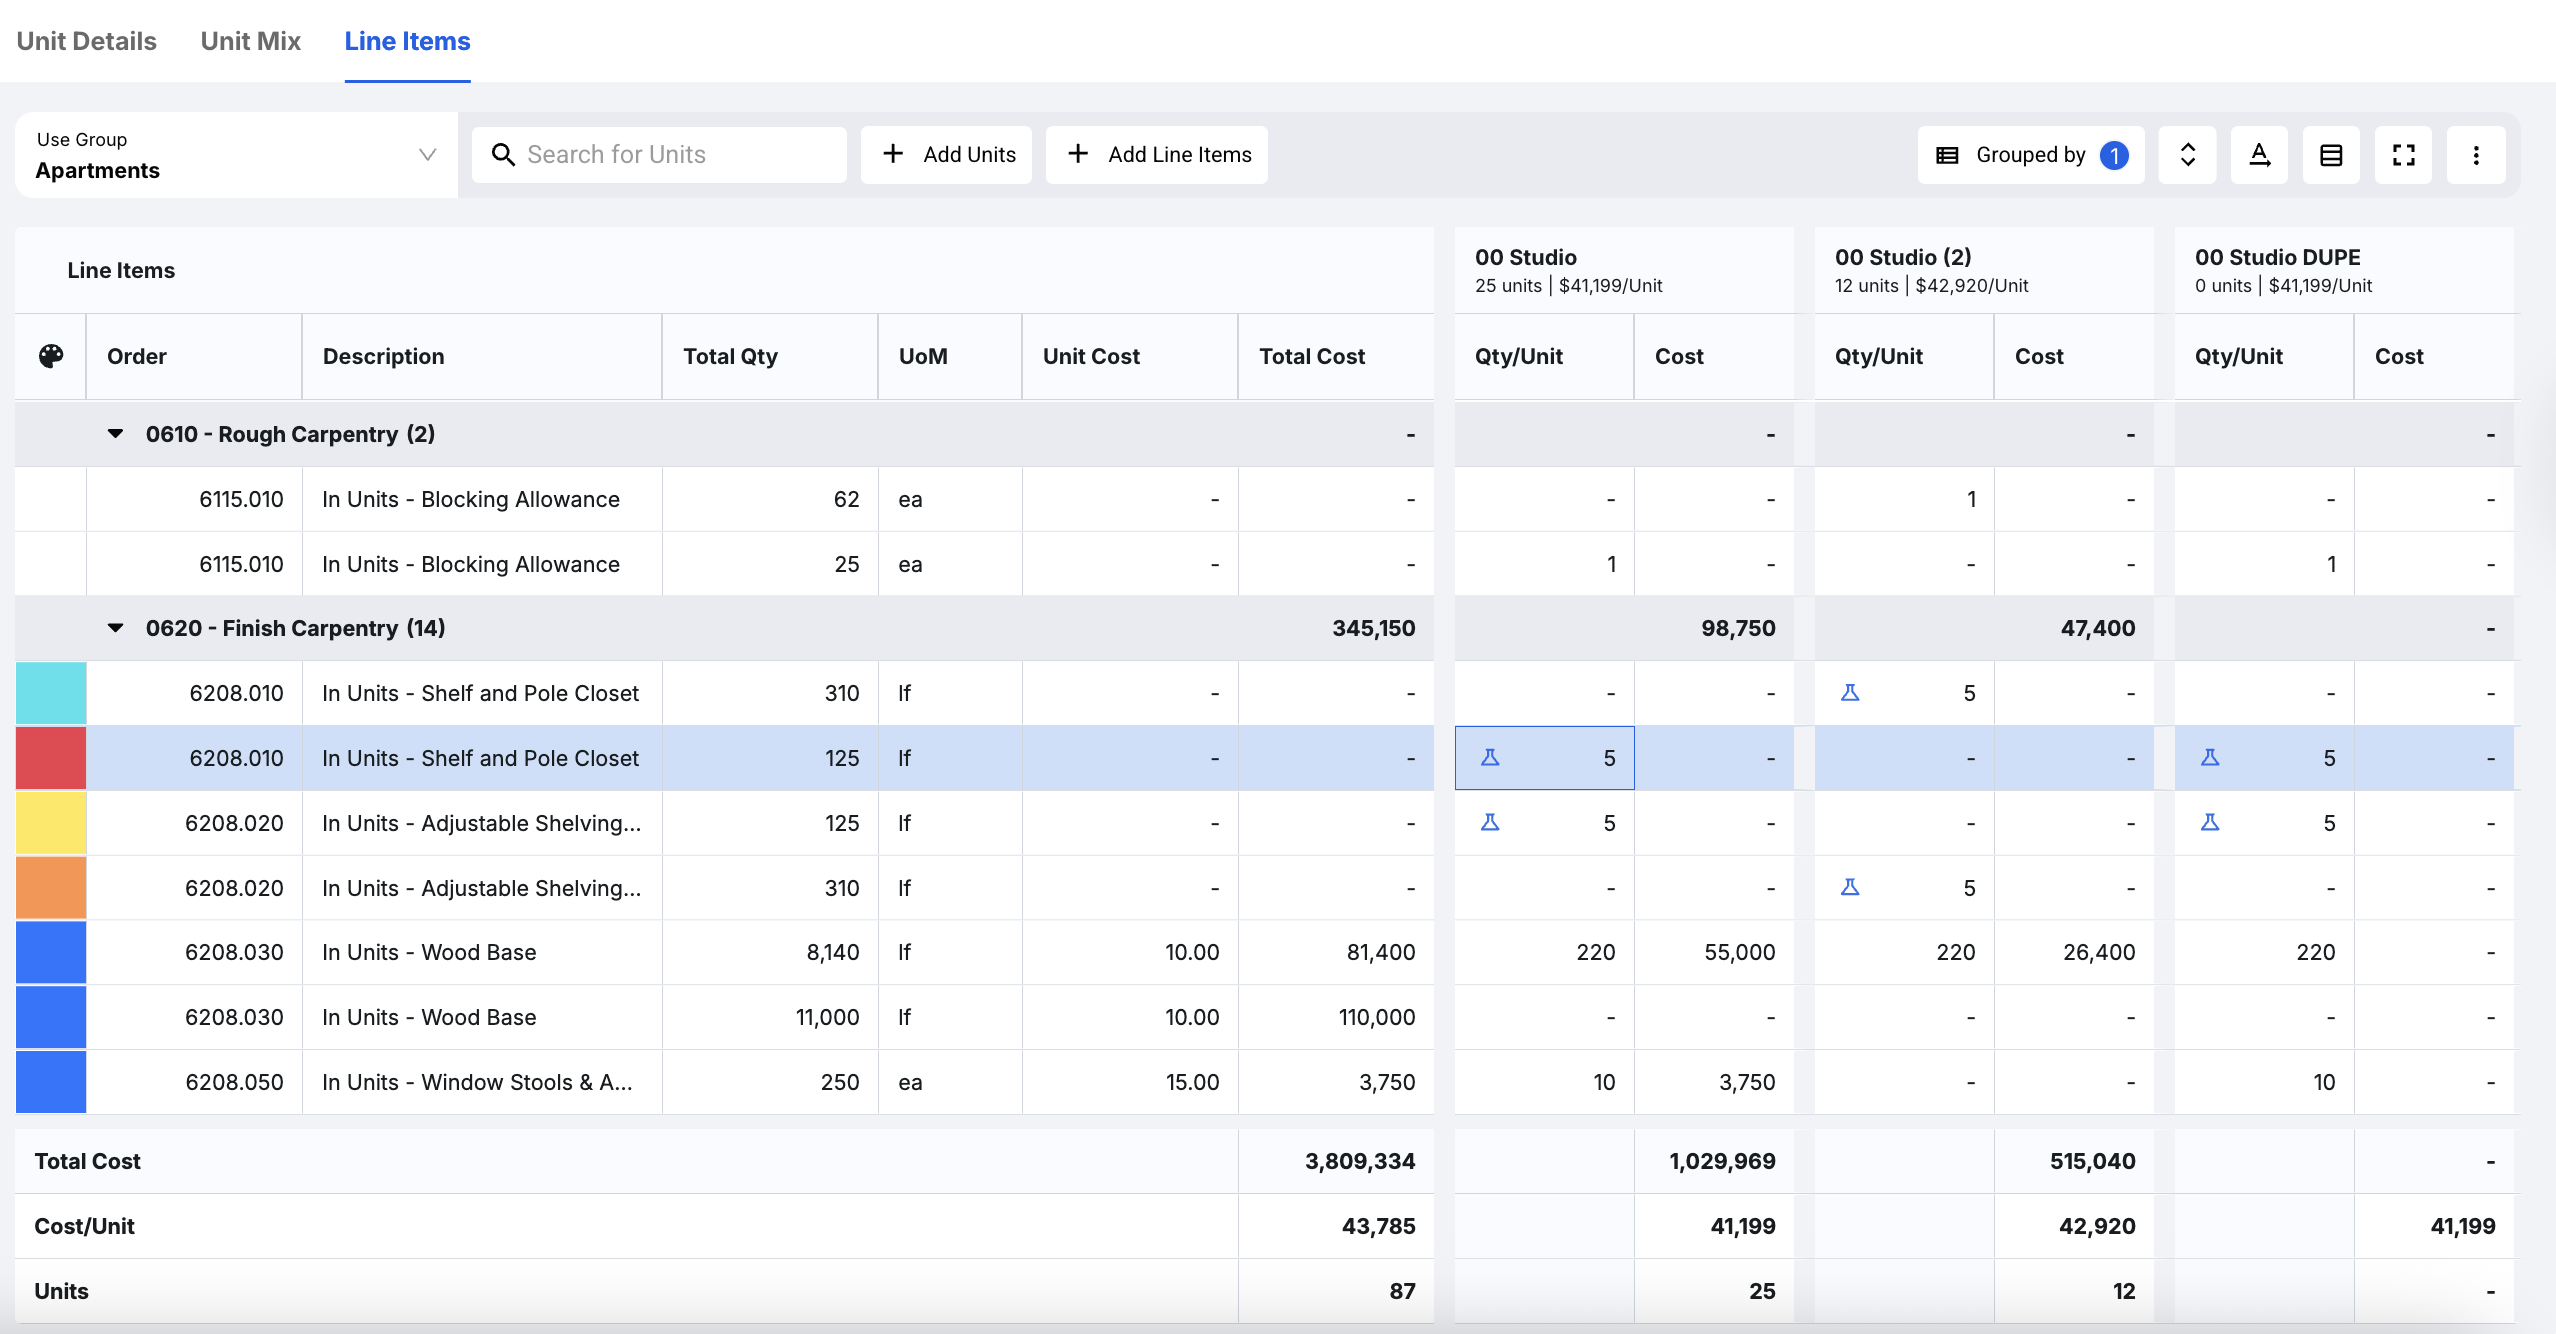
The next step in using the Units tab is to understand how to use the Line Items section. Each one of these units has its own set of finishes. When we go to Unit Line Items, you’ll notice that we can use quantity formulas the same way that we would in the Detailed Summary, Line Items, Room Line Items, or any of the other areas in Ediphi where quantity formulas are useful.
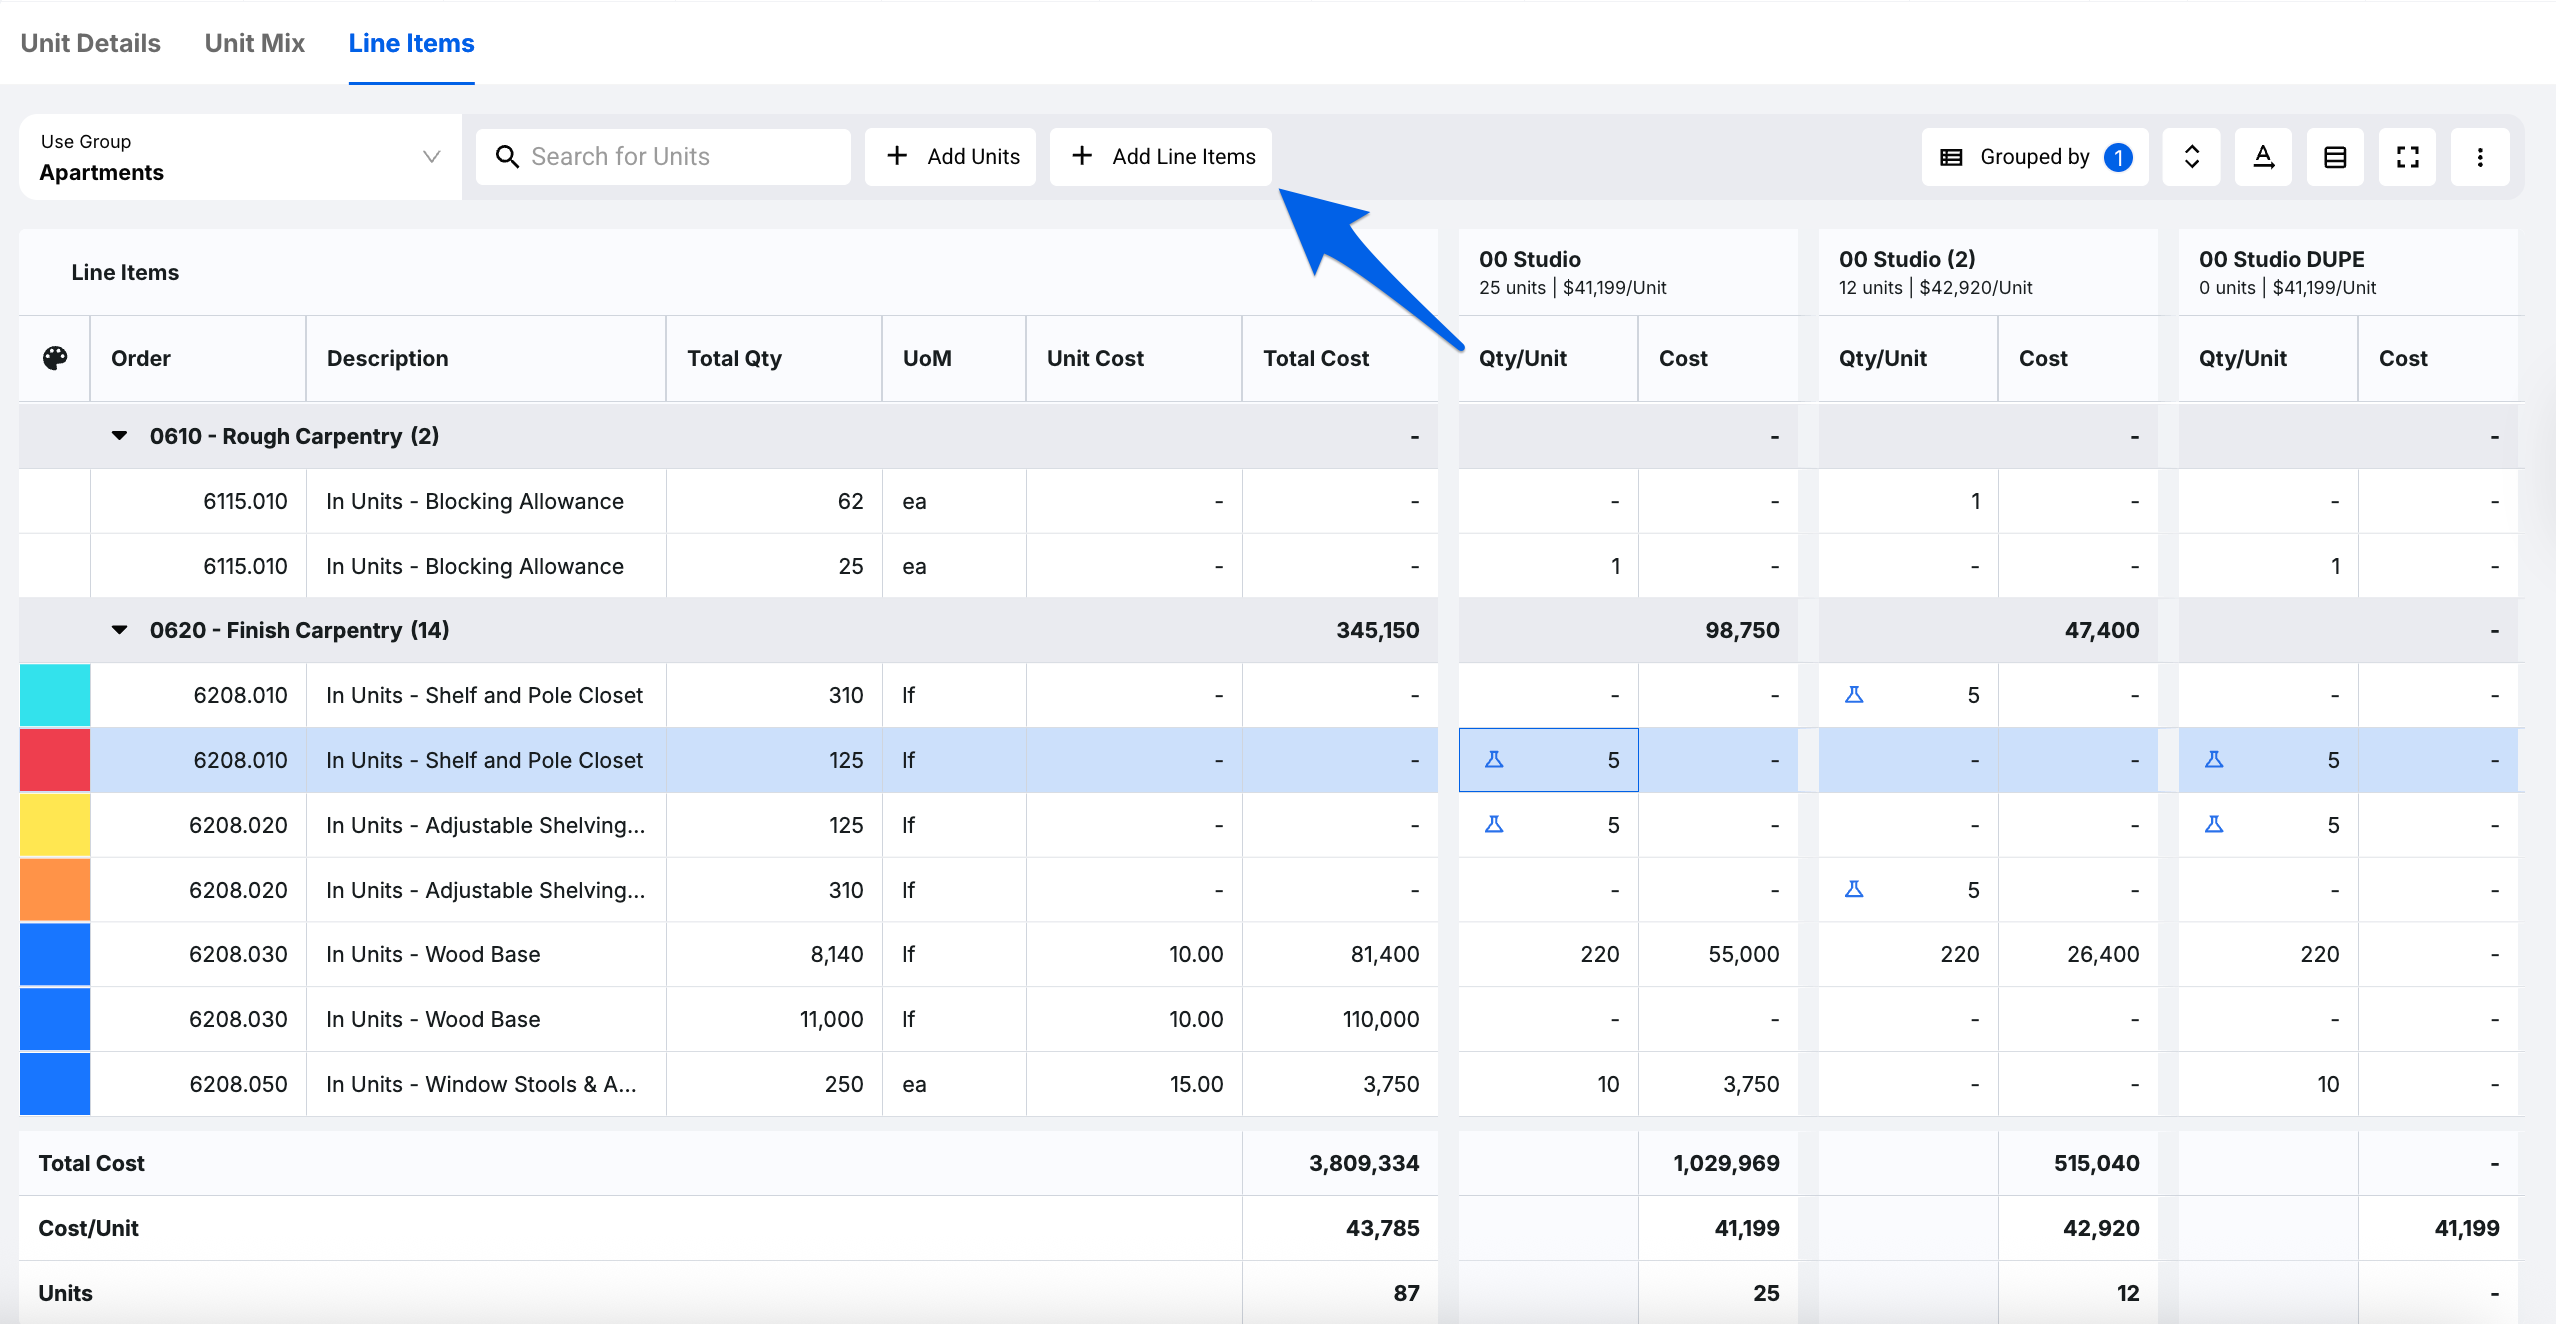
You can also add new line items from here by clicking on the + Add Line Items button next to + Add Units:
A modal will appear, allowing you to select any line item from the UPC. Click on the checkboxes of the line items you would like to add to your Unit Line Items. After filtering, searching, and selecting your line items, either quickly add them to the estimate or review them first:

To duplicate or delete a line item within Unit Line Items, you can right-click on the line item, and a dropdown will appear, allowing you to choose one of those options:

Another useful tip for Unit Line Items is understanding the different ways that you can calculate interior partitions. You’ll see in our example project that we have a handful of carpentry finishes, like Install Doors, Wood Base, etc.:
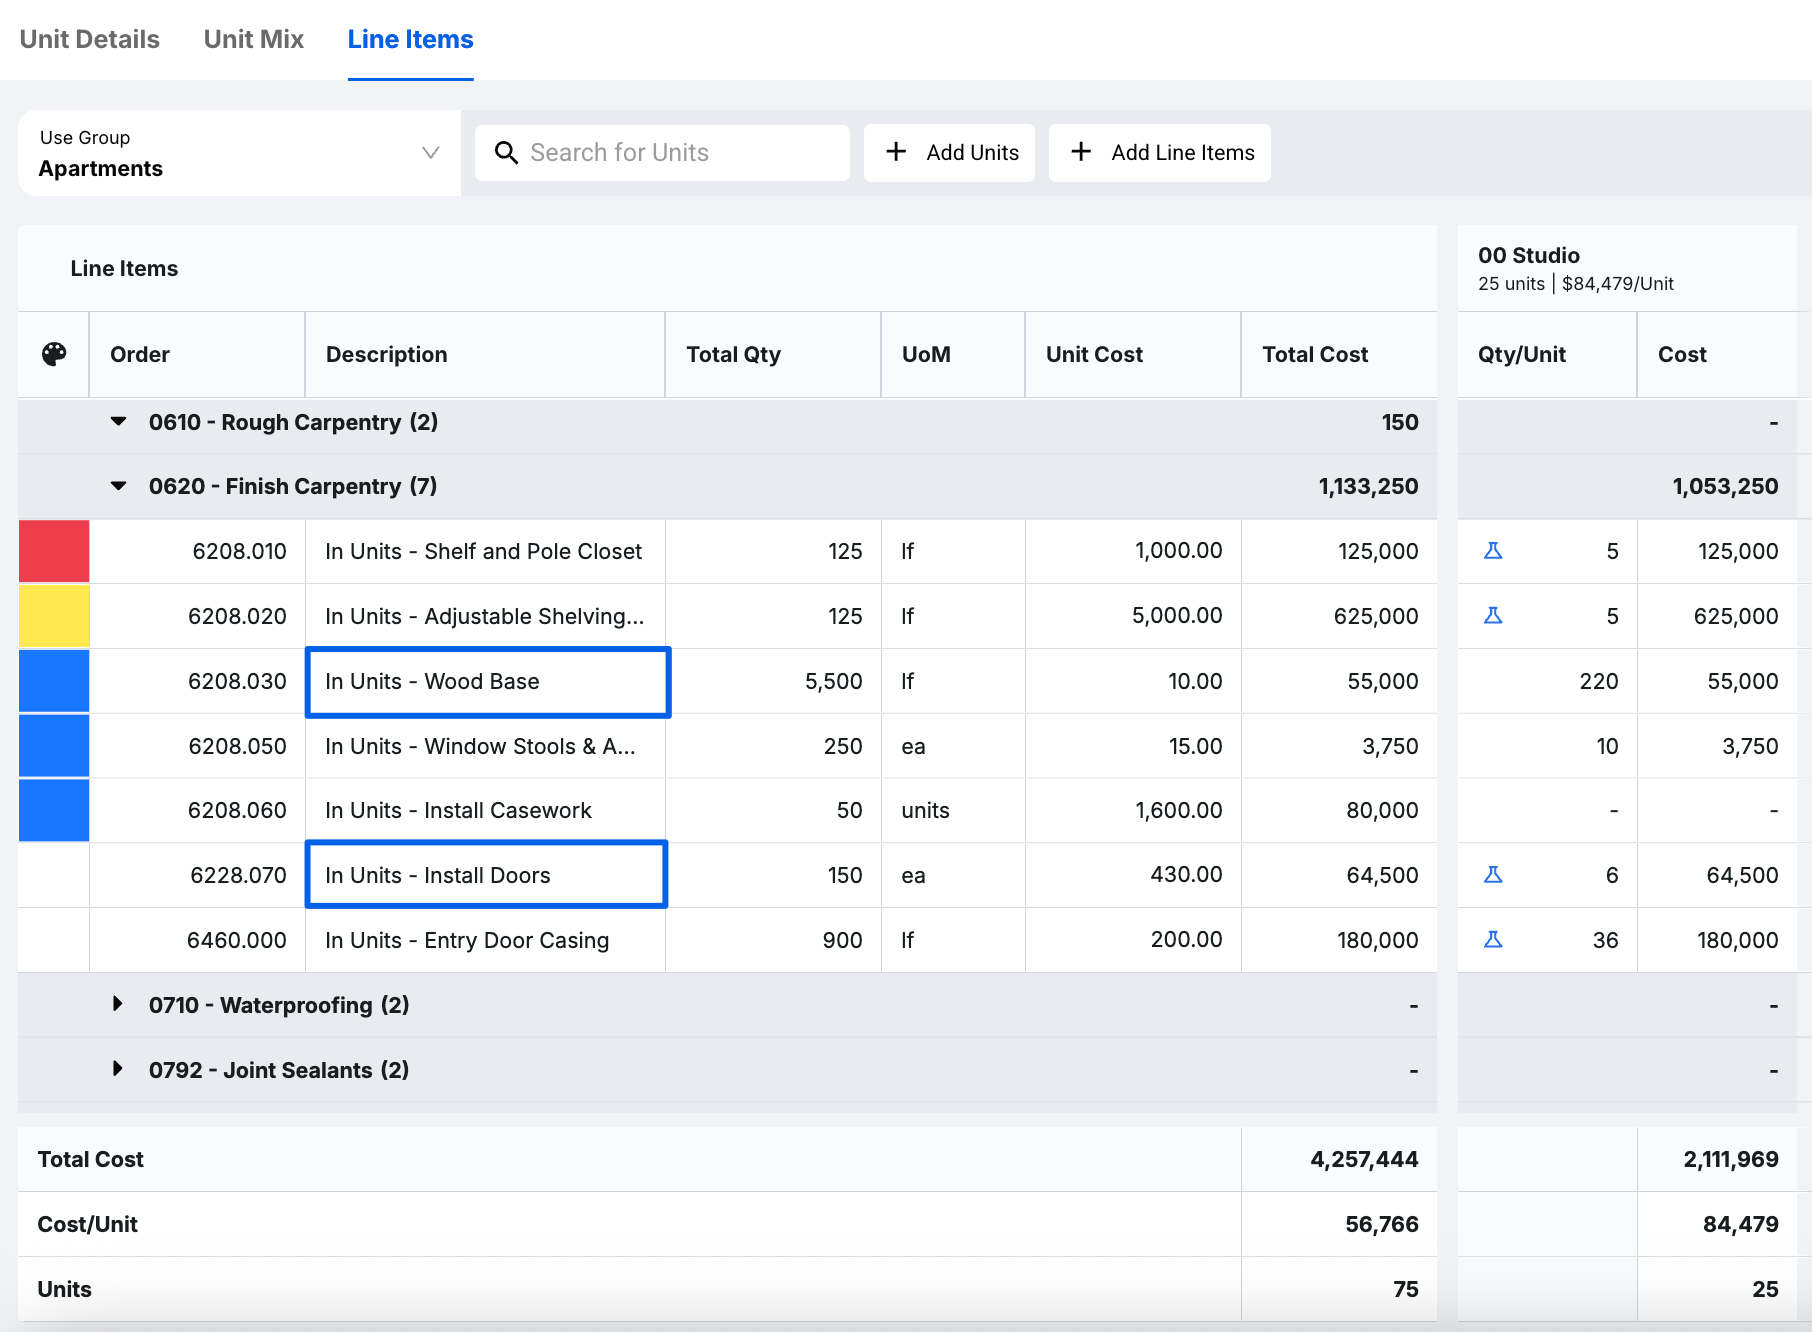
The reason why these carpentry finishes live inside Unit Line Items is that there is a specified amount of Install Doors and Wood Base in each of these units that is typical to that specific unit type. If we were to change the geometry of the building, or go through design iterations but keep the same standardized shape of each unit, it’s advantageous for us to track that quantity of carpentry finish within the Unit Line Items, so that no matter how many units we decide to include in our estimate, the quantity of carpentry finishes will always be captured.
Remainder Column
If a user overrides the Qty, Ediphi won't be able to calculate cost data for any impacted Units. The Remainder column in the Units Line Items tab will appear showing the difference between the new Qty and the calculated Qty. They can clear the remainder by overriding the Unit's Qty/Unit cell to allow the new math to calculate correctly. To remove the remainder column, refresh the Total Qty cell by selecting it and pressing the backspace key.
When a value is overridden, the Cost/Unit value in the header and footer of each unit will be shown as blank until the override is cleared, as we will not be able to provide an accurate cost/unit when your Qty values within units aren't spread from the remainder.

To return to the original Total Qty, simply select the Qty/Unit cell to highlight it and press the backspace key.
This column exists to keep the math accurate throughout the estimate, including the Detailed Summary, Estimate Line Items, and Unit Line Items. For example, if you override a Unit Line Item in the Detailed Summary, the Unit Line Item will show the remainder in the Units tab.
Note: Any export of the Units tab will not show the remainder column, as it's a temporary column that will disappear once math is reconciled.
Pro Tip: We recommend updating each individual unit Qty based on values that will be populated to individual units, as this will ensure that the Total Qty matches the math within the aggregate unit values.
Common Items
Another location where you can track the total amount of walls and areas is under the Common Items tab.

This tab allows us to track all of the walls and areas for the entire building in one place. This is particularly useful when we think about walls that are shared between two rooms or common areas within buildings.
Rather than counting those walls within your Unit Line Items on a unit-by-unit basis, or in your Room Line Items on a room-by-room basis, this allows you to avoid double-counting walls that are shared by two rooms or two units, and automatically calculates the square footage based on a takeoff of lineal feet, multiplied by the height of that floor. This also applies to common areas.
You can always add a new Common Wall or Common Area by clicking on the + Add Line Items button.

A modal will appear, allowing you to select any line item from the UPC. Click on the checkboxes of the line items you would like to add to your Common Walls or Common Areas. After filtering, searching, and selecting your line items, either quickly add them to the estimate or review them first:

Note: When selecting from the UPC, the platform will only display items that have a Unit of Measurement of SF (Square Feet). If you don’t see the specific line item you want to add as a Common Wall, ensure that the Unit of Measurement is set to "sf".
FAQ
- The search function is not finding my line items. Why not?
The search function will find your units, as they are the main focus in each of the Unit sections.
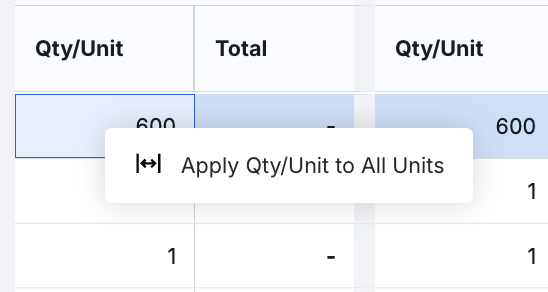
- Can I bulk add Qty/Unit across all units to save time?
Yes, you can! Right-click the Qty/Unit cell you would like to spread across all units and select Apply Qty/Unit to All Units.
- Is there a way to make the table smaller (more compact) so I can see more data?
Yes! If you wish to change the size of your table settings in Units, you can do just that. At the top-right of the grid, you will see some icons. Click on the table icon to select from Default, Compact, or Spacious. You can also select the full-screen icon for a larger view.

- How does the Paste From Clipboard function work when adding units?
This option for adding units is very effective for pasting items in bulk from a worksheet. In a worksheet (Microsoft Excel, Google Sheets, Apple Numbers, etc.), add the columns that match the Use Group you are working in. For example, if you are working in an Apartments Use Group, you may add Name, Area, Beds, Baths, Half Baths, and Terminal HVAC. Fill out these columns with data in a worksheet and then copy them all (right-click, Copy or CTRL+C). Open up the Add Units modal and click on Paste From Clipboard.
- I am trying to save a unit as a template, but I do not see the option to do so. How do I save a unit as a template?
In order to save a unit as a template, you must be a Global Admin. All other permission levels will not see this option. See our Saving Units as Templates section to learn more.
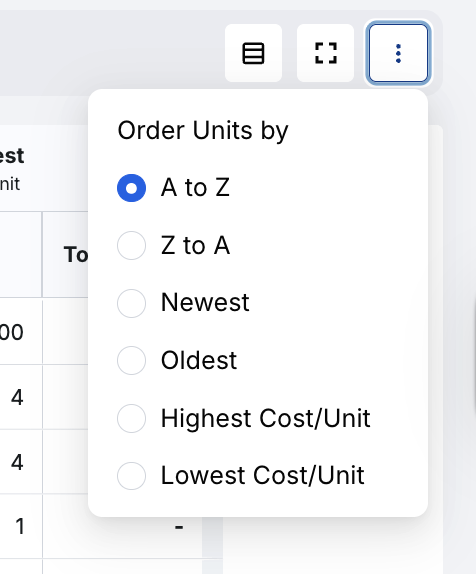
- I added several Units, but I want to re-order them. Is there a way for me to do this?
Yes! You have the ability to change the order of your Units by clicking on the 3 dots (ellipses) in the top right corner. This menu gives you several options to view your units across the page.
- Is there a way to expand or collapse all line items like I can within the Estimate’s Detailed Summary?
Yes, you can! In the Line Items section of Units, at the top-right of the grid, you will see some icons. Select the vertical arrow icon to either expand or collapse your line item rows.

- Can I access units from the main estimate Line Items tab?
Yes! You can click the Blue Link Icon on any Unit Line Item to be taken directly to the source in the Units Line Items section.
- When I have a Use Group with Units in a Building it isn’t assigned to, why are my Unit totals inflated? How do I fix it?
Currently, the totals displayed in the Units column, the table footer, and each Unit’s column header include all of the Use Group’s Unit allocations across all Buildings. This includes Buildings the Use Group isn’t assigned to. To fix this: select the errant Building and clear the Use Group’s Unit allocations in that Building, or edit the Use Group’s assigned Building in the Manage Use Groups modal.
- Do you have a drawing example outlining the different terms within Ediphi?
Yes! See below.
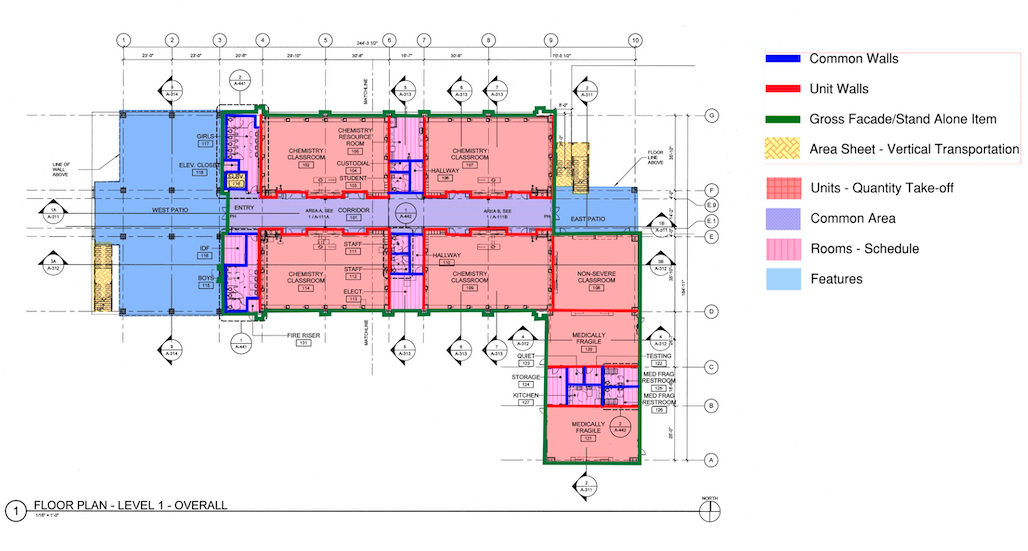
If you have any questions, feel free to contact our support team, and we'll be happy to help!